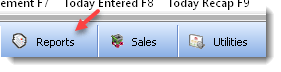
BCSS Software Administration
The Importance of Data Backup
By default shop data is stored in files in the BCSS folder (C:\BCSS). These files are worth the cost of having to reenter all data lost since the last backup of data.
An automatic backup can occur once every day at the time set in Program Setup on the General tab (at the bottom of that page). The backups should go to a folder off of the hard drive, onto an external storage device, like a flash drive. Go to File > User Interface to set the 'path' to the folder. In the following example, 'F' is the drive letter designation assigned by Windows:

Easy Local Backup Options
In the BCSS folder the names of the files have extensions of .dbf, .cdx and .fpt.) If a different location was selected during installation of the program, the BCSS folder will be in that location.
- Copy the BCSS folder and save it (paste) to a flash drive.
- Right click on the BCSS folder copy, click Rename and type a name that includes the date, like BCSS-3-2-23.
Automatic Backup to an External Storage Device
Note: The computer of course must be on at the time backup is to take place and power options should be set to 'never sleep'.
By default backups are created on C: drive in a folder named 'bcss data do not remove'. Backups should be made to an external storage device to avoid losing data to a computer problem.
(A 'device' is an external hard drive, flash/pen/thumb drive or any other form of external storage.)
- To set the time of day for auto backups, go to Program Setup > General Tab.
- At the bottom enter the time of day for backups in 24-hour format.
- Save/Exit
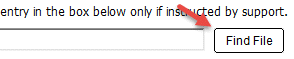
- Click on File then User Interface.
- Click on the Find Button:
- Navigate to the folder containing the backup folders. If no folder exists, right click, select 'New' then 'Folder' and name the folder, something like 'BCSS Data Do Not Remove'.
- Click Open.
- Save/Exit
- Close the program and reopen it.
- Click on File then User Interface.
- Verify that the path set to the backup location was saved. If not, turn User Account Controls off and repeat steps starting with 4 above.
At the time designated for backups, a message will appear giving a 2-minute heads up that the auto backup will commence. Use the 2 minutes to close any BCSS windows (like sales, batch enter, etc.) but leave the BCSS main window open. (The program has to be open in order for tasks to be performed.)
Please do not attempt to use the computer during the backup process.
A message must appear confirming a successful backup.
It would be a good practice to look in the backup folder then the folder for the day of the week to confirm that files exist with current dates. (Use the 'Details View' to view dates:)
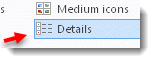
Sort 'Date modified' once or twice to bring the most recent files to the top of the list.
Manual Backup to an External Storage Device
Note: The back-up procedures below assume you can access the BCSS program. If that is not possible then back up data simply by coping the entire BCSS folder (C:\BCSS or C:\Program Files(x86)\BCSS or C:\Program Files\BCSS) and pasting it in other locations (like a flash drive). Rename each copy and include the date of its creation.
- Create a folder on the flash drive and name it BCSS DATA DO NOT REMOVE. Within those folders create a folder for each day of the week.
- Open BCSS.
- Select Utilities then 'Backup Database Manually'. (In older versions of the software, the link may be 'Backup Database Locally'.)
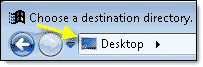
- A window will open named 'Choose a destination directory'. It's layout will vary with Windows versions but the action will be the same, which is to click on Computer (or My Computer IN XP). (Scroll the left navigation window up and down to find Computer.)
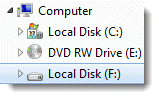
- Double click on backup drive. (The drive in this example is 'Local Disk (F:)'. The name of the flash drive and the drive letter will likely be different on your computer.)
- Double click on the folder where the data is to be stored.
- Select Open.
The message "Backup complete" will confirm a successful backup. If the confirmation does not appear, close BCSS, reopen it and try again.
Confirm the Backup
Verify that files have been saved.
- On the Desktop click on Computer or My Computer. (If that option is not present, on the desktop, right click away from any icon and select Personalize (or Properties). Click on 'Change desktop icons' and check all the boxes under 'Desktop icons'. Click OK.)
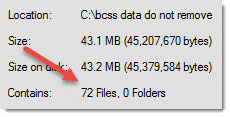
- Right click on the folder containing the backup files.
- Select Properties.
- The 'Contains' field should read '72 Files, zero Folders'.
Recover from Errors
Shop data is saved in the FoxPro database which has a system of checks and balances to keep data in correct form. When data becomes corrupted (by electrical surges, viruses, defective computer components and a variety of causes), the system will alert with an error message.
Make a copy of the C:\BCSS folder.
Restore the last data backup to see if the issue gets resolved. If so, reenter any data that was entered since the last backup and resume.
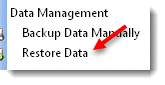
Restore Data
Restoring data is basically the opposite of creating a backup.
Select Utilities then Restore Database. A window will open. Navigate to the backup folder, select it and click Open then Save.
There will be a pause during restoration and when completed, data will be displayed.
Close the program and reopen for a fresh start.
If BCSS cannot be opened open the folder containing the backup files, press Ctl+A to select all files then Ctl+C to copy all files to the clipboard. Go to the BCSS folder on C:, right click on it and select Paste and choose to overwrite existing files.
End-of-Day Procedures
- Create a paper record by printing reports for a time period desired. For reports for the day only, use the reports at the top of the program: Today Entered F8, Today Recap F9, Today Sold F10, Today Settled F11. For other time periods use the settings in Reports:
- Create two data backups - one to hard disk and the other to an external storage device - with the day's date.
- Take the external device home so you can recover from any shop disaster.
- Shut the computer down and disconnect it from the power supply.
Turn Power-Saving Options Off!
By default laptops are set to sleep or hibernate after the time set in Power Settings in the Control Panel elapses. On all computers, to assure that the computer will not be sleeping at the time for the automatic backup of BCSS data, go to the Control Panel, Power Settings and adjust settings to assure that the computer will be responsive at backup time.
When the backup procedure begins, an alert will appear. The actual backup will not start for two minutes, to allow any processes running in BCSS to complete (to avoid data corruptions). Do not interfere with the process. The entire process may take about five minutes. When completed 'Backup complete' will appear. Close the message window and resume use of the program.
The backup will be sent to a folder on the C: drive, (C:\bcss data do not remove) which will contain a folder for every day of the week. That folder should be dragged (copied) frequently to an external drive (like a flash, thumb, pen drive) to avoid losing all backups to a crashed hard drive (and a myriad of other causes of lost data). In newer versions of the software these steps can be avoided by using an external storage device and setting it's location under File > User Interface.
It is imperative that data be stored off the computer. In the event of fire, theft, water damage, electrical surges, power failures, crashed drives, accidental deletion... data can only be recovered if it saved on an external storage device, or online.
There are several reliable online data backup services. Google Drive is free and services like Dropbox and Carbonite can back up all data on the computer, not just BCSS data.
 Don't save any files to the BCSS folder (other than the files placed there by the program). Such files would be lost if the BCSS folder is deleted or lost. Place all ancillary files in a separate folder on an external device.
Data Reduction
![]() Data Trim ($119) restores performance by removing older data from the working database while storing all current data in an archive. The following records are removed based upon a 'trim date' provided by the shop owner:
Data Trim ($119) restores performance by removing older data from the working database while storing all current data in an archive. The following records are removed based upon a 'trim date' provided by the shop owner:
- All inventory received prior to the trim date that has been sold and settled
- All settled sales, disbursements and settlements prior to the trim date
- All items deleted using the inventory batch-delete option (under Inventory in the program)
- The program now removes consignor records for which there is no current unsold or unsettled inventory, and for which there never has been inventory.
Other Options:
- Do not delete sales/settlements records that have deleted items with in dates after the trim date.
- Do not delete any consignor records or delete those with no current unsold or unsettled inventory and those for which there never has been inventory.
- Delete all items in a specific category up to a date provided.
Exclusions:
- Inventory records with quantity greater than zero will not be removed.
- Any record associated with an unsettled sale will not be removed.
Data Restore Messages
Please choose a valid Directory
Please note that if you restore data from a location that is different from the location where BCSS backed up data, you will see a message after restoring which reads, "Please choose a valid Directory." Just close the message and verify that data has been restored. This message appears because BCSS did not know about the new location but the restoration should be successful.
Restoration Failed
"Restoration failed. You could be missing part of your database, or you might have chosen a restoration source that doesn't exist."
- "missing part of your database": The database chosen for restoration is not usable. Chose another copy of the database. If none is available, contact support, consign@usa.com.
- "a source that doesn't exist": No database exists at the location chosen. Choose a correct location of a viable database.
Restoring or Erasing Data from within BCSS
Restoring data is basically the opposite of creating a data backup.
This is an example of restoring blank database (to erase all existing data):
![]() Make sure you have a copy of your data before restoring the blank database. One way to do that is to make a copy of the BCSS folder.
Make sure you have a copy of your data before restoring the blank database. One way to do that is to make a copy of the BCSS folder.
Select Utilities, Restore Database.
To proceed, click on the left image to close the warning about losing data.

Navigate to the C: Drive on the left panel:
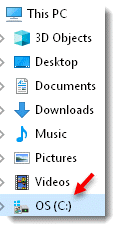
(It may be necessary to scroll the left panel up and down and/or click on 'This PC' or 'My PC' or 'Computer' - depending upon the Windows edition.)
Double click on C: then double-click on the BCSS folder:
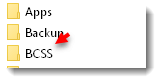
Double click on the folder named 'Blank Db'.
Select Open then Save.
The computer will pause as it removes data.
Close BCSS and reopen it to create a new clean connection to the database.
Restoring Data outside BCSS
The BCSS Folder (C:\BCSS) contains data files as well as all other files needed to use the program. The BCSS folder itself cannot be copied from one source to another (one computer to another) but data files alone (with filename extensions of dbf, cdx, fpt) may be copied from other sources (a previous data backup or files returned to you from tech support) just by copying files and pasting (or extracting) them into the BCSS folder.
Data Export
Please note: MSWorks does not import data in correct format. Please use MSOffice or use free Open Office or free Google Docs online.
Exporting Data from BCSS
Data may be exported from BCSS for different purposes:
- Export information to be used in other programs.
-
In BCSS under Utilities select export options under 'Export to Excel' to export a limited amount of information (mostly 'contact information' like name, address, phone).
- Export spreadsheets to be used to update current BCSS records and/or to add new records.
-
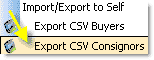
In BCSS under Utilities select export options under 'Import/Export to Self' to export an extensive amount of information.
Please also refer to Data Import for importing BCSS Records from 'blank' spreadsheet templates (available from support).
Tip: When importing into BCSS for the first time, only import 1-5 records to test your procedure.
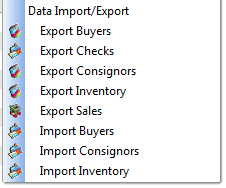
1. Export information to be used in other programs
Select which data to export under Main Menu, Utilities. The options are:
In the 'Save As' window, the filename will be auto-entered in the 'filename' field. Change the name if desired. It is helpful to include a date (using hyphens, not slashes). Leave 'Save as type' as shown:
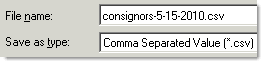
At the top of the open screen, for 'Save in' select the Desktop:

Click Save.  The exported file will be saved on the Desktop with the name specified.
Find the file on the Desktop. It may look something like:

Double click on the file. Your PC should have a program that will open it. (If not, Google Docs is free to use online https://www.google.com/drive/) or download the free OpenOffice from http://www.openoffice.org
The CSV files will contain the following information:
- The Buyer List (buyers.csv - Diamond and Virtual only) will contain columns (fields) named Customer ID, Name, Address 1, Address 2, City, State, Zip, Phone 1, Phone 2, Email, DOB, Mailings?, User Text, Notes, Credit Limit, Credit Rate, Tax ID, Discount, Education, Employer, Income, Interest, Auto, Internal ID
- The Check List (disburse.csv) will contain columns (fields) named Payment ID, Name, Address 1, Address 2, City, State, Zip, Country, Phone, Email, Check Number, Date, Amount, Memo, Bill, Cash Withdrawal, Commission ID
- The Clients and Vendors List (consignors.csv) will contain columns (fields) named Consignor ID, Name, Street 1, Street 2, City, State, Zip, Phone 1, Phone 2, Email, DOB, Mailings?, Reports?, Percentage, Disposition (1: Donate 2: Destroy 3: Return 4: Transfer to Transfer Account), User Date, User Text, Notes, On Line Access?, Password, Balance Credit, Internal ID, Store Credit, Last Sale, Last Settlement, Beginning Balance, Active?
- The Inventory List (items.csv) file will contain columns named ItemNum, Internal Consignor ID, In Date, Quantity, Description, Details, Original Price, Current Price, Lowest Price, Consignor Share, Disc Date, Discount, Notes, Picture, Rental?, Barcode, Buy Outright?, Internal ID, Category ID
- The Sales List (sales.csv) will contain columns (fields) named Invoice ID, Name, Address 1, Address 2, City, State, Zip, Salesperson, Terms, Payment Method, Discount, Tax Percent, Paid, Date, Quantity, Price, Description, Item ID, Void, Email
The Sales Export will only contain sales since the last export. To export all sales, go to Program Setup and check All Data on the General tab.
Please refer to the documentation of other programs (word processors like MSWord, databases like MSAccess) to learn how to use the data.
2. Use spreadsheets to update current BCSS records and/or to add new ones.
Before information in the BCSS database can be edited in a spreadsheet, the data must first of course be exported from BCSS into a spreadsheet. This is done separately for consignors, inventory, (and buyers in BCSS Diamond and Virtual). When changes are made on the spreadsheet (and/or new records are added) BCSS will know which records in the spreadsheets are preexisting (from Internal IDs) and which are new (without Internal IDs). New records will be created in BCSS for new records in the spreadsheets.
Export BCSS Data to Spreadsheets
- Select which data to export under Main Menu, Utilities. The options are:
-
- The Buyer List (buyers.csv - Diamond and Virtual only) will contain columns named Customer ID, Name, Address 1, Address 2, City, State, Zip, Phone 1, Phone 2, Email, DOB, Mailings?, User Text, Notes, Credit Limit, Credit Rate, Tax ID, Discount, Education, Employer, Income, Interest, Auto, Internal ID.
- The Client List (consignors.csv) will contain columns named Consignor ID, Name, Street 1, Street 2, City, State, Zip, Phone 1, Phone 2, Email, DOB, Mailings?, Reports?, Percentage, Disposition, User Date, User Text, Notes, On Line Access?, Password, Balance Credit, Internal ID, Store Credit, Last Sale, Last Settlement,Active?
- The Inventory List (inventory.csv) will contain columns named ItemNum, Internal Consignor ID, In Date, Quantity, Description, Details, Original Price, Current Price, Lowest Price, Consignor Share, Disc Date, Discount, Notes, Picture, Rental?, Barcode, Buy Outright, Internal ID
Note that each record has been assigned an Internal ID. This must not be changed! When data is imported back into BCSS, the program will use the Internal ID to associate inventory with consignors.
- Open the .csv file in Microsoft Excel (or some spreadsheet program other than MSWorks).
- Make and save changes to any information on the spreadsheet.
- To create new records in BCSS from the spreadsheet, go the last line in the spreadsheet and enter information for a new record on the next blank row. DO NOT enter an Internal ID. When the spreadsheet data is imported into BCSS, new records will be created in BCSS (because BCSS will recognize that no Internal ID exists, and will assign one).
Any field left blank will be filed by BCSS with the default value for that field. For example, the default value for Original Price (in inventory.csv) is zero. Leaving Original Price blank will cause BCSS to enter 0 as the value for that item when the item is imported into BCSS.)
- NEVER USE COMMAS, QUOTATION MARKS OR LINE BREAKS (CARRIAGE RETURNS, 'ENTER' ON THE KEYBOARD) IN SPREADSHEET ENTRIES.
- Use 'T' for True (instead of 'Y' for 'Yes') and 'F' for 'False' (instead of 'N' for 'No') for fields like Mailings?, Reports? On Line Access?...
- Disposition Codes are: 1 Destroy; 2 Return; 3 Donate; 4 Transfer to House
- Use this format for phone numbers: 555-555-5555.
- Use this format for dates: 8/7/2009.
- Save the spreadsheet.
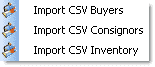
- In BCSS, under Utilities, Import/Export to Self, select either Import Buyers, Import Clients or Import Inventory.
- Select the appropriate .csv file. (If the suggestion above was followed, the file will be on the Desktop.)
- Spot check records in BCSS to verify that changed information has been updated and new records have been created, if applicable.
Future Import/Export
IF new records were added during import, the .csv file cannot be used again to edit and/or add more BCSS records because those new records will not have assigned Internal IDs. If the spreadsheet is imported a 2nd time with new records having no Internal ID assigned, duplicate records will be created for the new records having no Internal IDs.
Before using the spreadsheet for another import, first export all records again from BCSS to make new Internal IDs available. If there are no new records in the .csv import spreadsheet, it is not necessary to export all records before using the .csv spreadsheet to amend BCSS records, however, changes made in BCSS after the import will of course not be in the import spreadsheet.
Duplicate Records
To eliminate duplicate records:
- Export all records to a .csv spreadsheet.
- In the .csv spreadsheet edit the duplicate record(s) changing any information to another person's or item's information.
- Save the spreadsheet and import into BCSS.
- Verify that the duplicate records have been replaced by the changed information.
Data Import
Consignor and inventory information may be imported into Deluxe, Diamond and Virtual databases from spreadsheets. (Buyer information may be imported into Diamond and Virtual databases. Deluxe does not have Buyer Records.)
Please note: MSWorks and OpenOffice do not import data in correct format. Please use MSOffice Excel or use free Google Docs online or free Libre Office (which is very similar to Microsoft Office).
Before importing, make a backup
of the current BCSS database. If the import isn't correct, restore the backup
and try again.
Why Import?
Save time: Hours of data-entry time may be saved if data for consignors and/or inventory and/or buyers already exists in spreadsheet format.
If data does not exist in a spreadsheet, entering data in a spreadsheet (for many items) and importing that information into BCSS may save time by using Excel's drag-and-fill function.
Also, data may be entered by multiple people using different computers and spreadsheets. Data from each spreadsheet can be imported into one BCSS database. Selective price labels may be printed by making settings on the Labels Screen.
Existing records can be edited in batch by making changes on the spreadsheet, entering the BCSS Internal ID (not the Client ID) and importing again.
The Spreadsheet Source Files
The 'source files' consignors.csv and inventory.csv (and buyers.csv for BCSS Diamond and Virtual) are used for entering information about consignors, inventory (and buyers).
Download the most recent versions from import.zip.
Entering Data in the Source Files
- The first row in each source file (spreadsheet) contains 'headers'. It is imperative that no changes be made to the order of the columns.
- The second row in the spreadsheet will be the first record in BCSS for a new Consignor, Inventory Item or Buyer.
- On any import sheet, in Exel, columns that aren't needed can be hidden.
- Open Office and MSWorks don't import correctly. Use Excel, Office Libre or Google Docs.
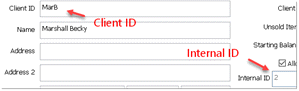
Client IDs and Internal Client IDs
The program allows stores to use their own Client IDs (so any existing IDs in use in other programs can be brought into BCSS (avoiding having to retag everything in the store, for one).
To make that possible, the program assigns its own ID ('Internal ID') to identify clients and keep track of their inventory and transactions regardless of client IDs.
The Client ID is assigned by the user when creating a new client record. It is used in the store to identify consignors. Punctuation should not be used. (Numbers or letters or a combination of numbers and letters may be used.)
If numbers are used for Client IDs, the program will suggest the next-available number for the record being created but the suggested number can be changed.
After the client record has been created, the Client ID can be changed without losing connections (links) between clients, item(s) and transactions.
Create Client Records Before Entering Inventory:
- Create a Client Record for every client for whom inventory will be imported. (Create records by importing client information from a spreadsheet (see how below) and/or by adding client records using the New-Client Screen in BCSS.)
- Export Client Records using 'Export Clients' under Utilities in BCSS:
- Save the file to the Desktop and set it aside for reference (for Client Internal IDs) when adding items to the inventory spreadsheet.
Preparing the Source Files for Import
Before importing, make a backup
of the current BCSS database. If the import isn't correct, restore the backup
and try again.
- Download the most recent import sheets from import.zip or use this sheet for client import and this sheet for inventory import.
- Use your computer's unzip program to extract the files from the zip folder.
- Open your computer's spreadsheet program (Microsoft Excel or something similar - Free spreadsheet programs are available from Google Docs. Please DO NOT use MSWorks or Open Office.)
- Click on File, Open and navigate to the folder containing the unzipped files.
- Select consignors.csv, inventory.csv or buyers.csv and click Open (or something similar).
- Save the file to the Desktop (where it can be easily located later). This will leave the original .csv files for future reference.
- In (consignors.csv, inventory.csv or buyers.csv) read the instructions and guidelines in Column A and delete all rows that contain instructions.
- Column A, Item Number: Leave blank. BCSS will auto-enter the Item Number.
- Column B: Enter the CLIENT INTERNAL ID (not the Client ID). Use Excel's drag/fill function to complete additional rows. Do not fill beyond the last row containing an item entry.
These are the locations of the Client ID and Internal ID on the new-client or edit-client screen:
- Column C, In Date: Enter the date the item was brought to the store. If no date is entered, the date field in the item record will be blank (and could be added later).
- Column D: Quantity: The number of items that will use the same Item Number
- Column E: Description: Up to 20 characters - Appears on price labels/tags and in reports
- Column F, Details: Up to 100 characters - appears on medium price labels and in detailed reports
- Column G, Original Price: Do not use this field. Enter selling prices in the next column, 'Current Price'.
- Column H, Current Price: Enter the selling price that is to appear on labels and tags. Any price can be edited later.
- Column I, Lowest Price: Leave blank for new items
- Column J, Consignor %: Enter in decimal form (.4 = 40% to the consignor); Leave blank if the % for the item is the default % set in BCSS, or if the item is buy outright.
- Column K, Discount Date: Leave blank for new items
- Column L, Discount: Leave blank for new items
- Column M, Notes: Enter any information as a reminder or as note for others in the shop to see.
- Column N, Picture: Enter a PC location (example: C:\Program Files\BCSS\Images\Morrison-recliner.jpg) or internet location (example: http://www.mywebsite/images/Morrison-recliner.jpg) of an image of the item.
- Column O, Rental: Leave blank for new items
- Column P, Bar Code: This may be left blank. Assign bar codes in BCSS after importing.
- Column Q, Buy Outright: Enter the buy price of a resale item
- Column R, Internal ID is a system ID created by BCSS for its own use. It can be viewed in a Consignor Record or in a Consignor Data Export. Do not make an entry in this column for new items. Do make an entry in this column to update information for an existing item.
- Column S, Category ID: Enter the ID # of the Category. (Category ID #s can be viewed in the program by clicking on Inventory on the Main Menu at the top then Categories.)
- Columns T through AM are for User-Defined Groups
- Column AN - Owner-Applied Number: Any sequence of letters and numbers desired to further identify the item
- Column AO, Buy Price: Enter the price paid for a buy-outright item. (Does not apply to consignments or rentals.) To avoid having to tab or scroll to this column for each item, cut the column, paste it next to column G, make entries, move the column back to the original position (column AO), save, import.
Note: Before importing inventory for a client, a client record must exist.
On the inventory import spreadsheet for consignments and buy outright:
Importing Data into BCSS from the Source File
Before importing into BCSS backup BCSS data. If the import produces undesirable results, just restore the data backup.
- After the import sheet has been prepared, in BCSS, under Utilities, select Import Clients or Import Inventory or Import Buyers.
- Navigate to consignors.csv, inventory.csv or buyers.csv (or whatever filename you assigned). Select the appropriate one. (A message will appear warning of duplicate records, if any. Abort the import, restore the backup, correct the duplication(s) and attempt to import again.)
- Records will be added to the BCSS database. View the new records for accuracy.
Reminder: BCSS Deluxe does not have Buyer Records.
Note: For batch inventory entry, after data has been imported, it may be necessary to determine the next ID number and enter it for the first new item being entered.
After importing inventory records, use Inventory on the top main menu then assign barcodes. If this is not done, labels will not print (if barcodes are 'turned on' in program setup).
Helpful Hint: Once a Client Record has been created in BCSS, it cannot be deleted. It may be edited and used for another Client but only if there has been no activity in the account.
When importing records for the first time, import just 1 or 2 records. View the records in BCSS for accuracy before importing more records. Finding mistakes at the very beginning will save time later on.
With Diamond or Virtual, incorrect Buyer Records can be deleted so when importing records for the first time, it might be better to experiment with importing Buyer Records (rather than Client Records which cannot be deleted).
Update BCSS Records Using a Spreadsheet
Client, inventory and buyer information in BCSS may be updated by importing the same record with the Internal ID entered in the Internal-ID column.
Save the current database first. If errors are made during import, just restore the saved database.
- If necessary, export client or buyer records to obtain Internal IDs.
- Save the exported data under another filename, like 'inventory-edit.csv'.
- Delete all of the items on the spreadsheet which aren't to be amended.
- Make changes to the records to be amended.
- Do not enter the Internal ID in column B. Enter the INTERNAL ID: column R for inventory, column V for clients and column X for buyers.
- Save changes.
- In BCSS, under Utilities, select Import Clients or Import Inventory or Import Buyers.
- Check the records of the items amended for accuracy. Restore the last backup to undo changes.
If there are many records in the exported file, edit each row to be changed, enter the Internal ID in the appropriate column, save and import. All other records will not be changed.
What Is a .CSV File?
Data is entered in a spreadsheet in table format. Cell E2 (column E, row 2) contains the value 'Milton' in this example:

Each row in the table is a record. In the above example, row 2 is the record for Ben Adams.
Each column in the table (A, B, C etc.) is a 'field' and contains information related to the record. In this example, Column A is the 'Client ID field'; Column B is the 'Name field' and so on.
A data file can be saved in 'comma-separated-value form' with a .csv extension. When a .csv file is opened in a text editor (like Notepad) the data appears on one line and the data (fields) are separated by commas - hence the name, 'comma separated'. Each time the database 'sees' a comma, it knows to move on to the next field.

When a .csv file is opened in a spreadsheet program (like Excel, Google Docs or Open Office), the data appears as it is displayed in rows and columns:
The CSV files contain the following information:
- The Buyer List (buyers.csv - Diamond and Virtual only) contains columns (fields) named Buyer ID, Name, Street1, Street2, City, State, Zip, Phone1, Phone2, Email, DOB, Mailings?, User Text, Notes, Credit Limit, Credit Rating, Tax Exempt ID, Discount, Education, Employer, Income, Interests, Auto
- The Check List (disburse.csv) contains columns (fields) named Payment ID, Name, Address 1, Address 2, City, State, Zip, Country, Phone, Email, Check Number, Date, Amount, Memo, Bill, Cash Withdrawal, Commission ID
- The Clients and Vendors List (consignors.csv) contains columns (fields) named Client ID, Name, Street1, Street2, City, State, Zip, Phone1, Phone2, Email, DOB, Mailings?, Reports?, Client %, Disposal, User Date, User Text, Notes, On Line?, Password, Balance Credit, Client Internal ID, Store Credit, Last Sale, Last Settlement, Beginning Balance, Active?
- The Inventory List (items.csv) file contains columns named ItemNum, Internal Client ID, In Date, Quantity, Description, Details, Original Price, Current Price, Lowest Price, Client Share, Disc Date, Discount, Notes, Picture, Rental?, Barcode, Buy Outright?, Internal ID, Category ID
- The Sales List (sales.csv) contains columns (fields) named Invoice ID, Name, Address 1, Address 2, City, State, Zip, Salesperson, Terms, Payment Method, Discount, Tax Percent, Paid, Date, Quantity, Price, Description, Item ID, Void, Email
Data Lost
If BCSS data has been backed up and the location of the backup files can't be found, start the backup procedure (Main Menu, Utilities, Backup Database) and observe the folder Windows is pointing to. The reference might look something like this:
Optionally, go to the Desktop. Hover over My Computer, use the right mouse button and select Search. In the search box enter 'cdx' (without quotes). Look for the path to the BCSS data folder in the search results.
Data Reduction
![]() Data Trim ($89) restores performance by removing older data from the working database while storing all current data in an archive. The following records are removed based upon a 'trim date' provided by the shop owner:
Data Trim ($89) restores performance by removing older data from the working database while storing all current data in an archive. The following records are removed based upon a 'trim date' provided by the shop owner:
- All inventory received prior to the trim date that has been sold and settled
- All settled sales, disbursements and settlements prior to the trim date
- All items deleted using the inventory batch-delete option (under Inventory in the program)
- The program now removes consignor records for which there is no current unsold or unsettled inventory, and for which there never has been inventory.
Other Options:
- Do not delete sales/settlements records that have deleted items with in dates after the trim date.
- Do not delete any consignor records or delete those with no current unsold or unsettled inventory and those for which there never has been inventory.
- Delete all items in a specific category up to a date provided.
Exclusions:
- Inventory records with quantity greater than zero will not be removed.
- Any record associated with an unsettled sale will not be removed.
Disable Windows 10 Sleep:
- Right click on the start menu and go to Power Options.
- Click change plan settings next to your current power plan.
- Change "Put the computer to sleep" to never.
- Click "Save Changes".
Disable Windows 7 Sleep:
- Click the Start button then Control Panel then System and Security then Power Options.
- Click Change plan settings next to the selected plan.
- Click Change advanced power settings.
- On the Advanced settings tab, double-click Sleep, double-click Sleep after, and then do one of the following:
- If you're using a laptop, click on battery or Plugged in (or both), click the arrow, and then click Never.
- If you're using a desktop computer, click Setting, click the arrow, and then click Never. Double-click Hibernate after, and then do one of the following:
- If you're using a laptop, click On battery or Plugged in (or both), click the arrow, and then click Never.
- If you're using a desktop computer, click Setting, click the arrow, and then click Never.
- If you also want the display to stay turned on, double-click Display, double-click Turn off display after, and then do one of the following:
- If you're using a laptop, click On battery or Plugged in (or both), click the arrow, and then click Never.
- If you're using a desktop computer, click Setting, click the arrow, and then click Never. Click OK, and then click Save changes.
Data Restore Messages
Please choose a valid Directory
Please note that if you restore data from a location that is different from the location where BCSS backed up data, you will see a message after restoring which reads, "Please choose a valid Directory." Just close the message and verify that data has been restored. This message appears because BCSS did not know about the new location but the restoration should be successful.
Restoration Failed
"Restoration failed. You could be missing part of your database, or you might have chosen a restoration source that doesn't exist."
- "missing part of your database": The database chosen for restoration is not usable. Chose another copy of the database. If none is available, contact support, consign@usa.com.
- "a source that doesn't exist": No database exists at the location chosen. Choose a correct location of a viable database.
Restoring or Erasing Data from within BCSS
Restoring data is basically the opposite of creating a data backup.
This is an example of restoring blank database (to erase all existing data):
![]() Make sure you have a copy of your data before restoring the blank database. One way to do that is to make a copy of the BCSS folder.
Make sure you have a copy of your data before restoring the blank database. One way to do that is to make a copy of the BCSS folder.
Click Utilities, Restore Database.
To proceed, click on the left image to close the warning about losing data.
Navigate to the C: Drive on the left panel:
(It may be necessary to scroll the left panel up and down and/or click on 'This PC' or 'My PC' or 'Computer' - depending upon the Windows edition.)
Double click on C: then double-click on the BCSS folder:
Double click on the folder named 'Blank Db'.
Select Open then Save.
The computer will pause as it removes data.
Close BCSS and reopen it to create a new clean connection to the database.
Restoring Data outside BCSS
The BCSS Folder (C:\BCSS) contains data files as well as all other files needed to use the program. The BCSS folder itself cannot be copied from one source to another (one computer to another) but data files alone (with filename extensions of dbf, cdx, fpt) may be copied from other sources (a previous data backup or files returned to you from tech support) just by copying files and pasting (or extracting) them into the BCSS folder.
Move Sold/Settled Inventory to Storage
Transfer sold/settled items to storage to remove items from active lists. (Doing so will speed up processing in the program but will actually increase the overall size of the database because two records will exist for the same item: one in inventory (with quantity = 0) and one in storage.)
- The quantity of transferred items is set to zero.
- Transferred items are removed from consignors' records.
- Items can be transferred back from storage.
- Items that will never be returned from storage should be deleted (by consignor, category and/or date using the Batch Delete Function).
![]() Move Inventory Items to and from Storage in Batch:
Move Inventory Items to and from Storage in Batch:
Procedure
- In BCSS click on Reports then select Inventory.
- Make settings on the Inventory Report Screen to define the items to be transferred.
- Leave the Inventory Report Screen open by minimizing it (so BCSS will know which items are to be transferred. If the Inventory Report Screen is closed, setting won't apply).
- In BCSS,, click on Inventory.
- Select Storage.
- Choose 'Move Items To Storage' or 'Move Items From Storage'.
- A list of items will be presented.
- As a confirmation, choose items to transfer. (Use the Check All and Check None buttons for convenience.)
- Click OK. The selected items will be moved to/from Storage.
View Stored Items
To view stored items, click on Inventory, Storage, View Stored Items.
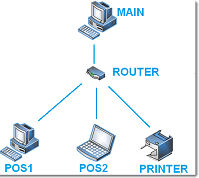
Networking 2 or more computers means connecting them so data and resources (like printers and Internet connections) may be shared by all computers in real time on the network. BCSS Diamond and Virtual support networking (cabled - not wireless) .
Networking with cables is not necessary to transfer database files from one PC to another.
Use a Flash Drive to Transfer BCSS Data
| A 'flash drive' is a small external storage device that utilizes a USB (Uniform Serial Bus) port on the PC. Flash drives are handy for other tasks. (You can, for example, save pictures on a flash drive and view those pictures on another computer or use drives that support 'ReadyBoost' to improve processing speed.) They are under $10 so purchase one with 2 gigs or more of storage space. |
How to Use a Flash Drive to Transfer BCSS Data from 1 PC to Another
- On the current computer, go to People Search Global and note the Site ID and Password. If there are none, proceed to the next step.
- On the current computer perform a data backup to a flash drive. https://www.bestconsignmentshopsoftware.com/bcss-manual/admin.html#backup
- On the new computer, download and install the correct BCSS edition: Intro, Deluxe, Diamond, Virtual
- Plug the flash drive into a USB port and in BCSS (under Utilities) perform data restore. https://www.bestconsignmentshopsoftware.com/bcss-manual/admin.html#restore
- Close BCSS and reopen it to verify that the data is present.
- Go to People Search Global and enter the Site ID and Password. If there are none, or if BCSS won't stay open, send an email to tech support to acquire an ID and password, or have them reset for the new computer. (BCSS will stop working on the first computer.)
- If settings aren't saving in BCSS, turn UAC off. https://vimeo.com/134888785
Email the Data Files to Yourself
After completing data backup, locate the data backup folder. Right click on it and select Send To. Choose 'Compressed (Zipped) Folder' (or something similar). Type in a name like bcssdata-mystore-4-1-13. Windows will compress the data into another folder named bcssdata-mystore-4-1-13.zip. Just send an email to yourself (or anyone) and attach the zip file.
On the secondary computer, download the email and save the .zip file to the Desktop. Double click on the zip file and unzip the contents of the zip file in the same Desktop folder, then perform data restore using the unzipped files.
Wireless Transfer
The easiest and fastest way to transfer data from one PC to another is via a wireless connection (Bluetooth, Wi-Fi, Infrared). The latest laptops have Wi-Fi enabled. Most modern computers have Bluetooth.
Cabled Transfer
As the name implies, cables can be used to connect 2 or more computers together.
Please note: A cabled Ethernet network is the only type of network that supports the use of BCSS for operational purposes.
For data transfer using cabled networks, 2 methods may be used:
1. Null modem serial cable (or parallel peripheral cable)
2. Special-purpose USB cables
Access the Shop Computer Remotely
"RemotePC" is the easiest (free) program for accessing the shop computer from 'anywhere'. Instructions follow. Installation on the shop computer and one remote computer is available from tech support ($69). To request please send an email.
RemotePC Installation
Find RemotePC website help here: https://www.remotepc.com/help/windows/default.htm
At the shop computer ('the host'):
Go to https://www.remotepc.com/download.htm and click on the Windows image:

- Using Google Chrome: When the download completes, click on the rectangle in the very-lower-left corner of the browser window to run the installation. Can't see a rectangle? Click on the square to the left of the X in the very-upper-right corner of the browser windows to maximize the screen.
- Internet Explorer or Microsoft Edge: Choose Run. Don't see Run? Click on the square to the left of the X in the very-upper-right corner of the browser window to maximize the screen.
- Firefox: Use the down arrow at the upper left to go to the Downloads folder.
- Lost? To the right of the Windows Start Button (at the very lower left of the computer screen) type 'downloads' (without quotes) to locate the Downloads Folder. Click on RemotePC.exe to start the installation.
Installation will place a desktop icon like this:

If RemotePC didn't start after installation, click the icon to run the program.
Press control+D to bookmark the page.
Upon first use, Click 'Signup Now' at the bottom of the RemotePC screen:

Select the Free option, complete Account Information and press Create My Account. A screen should appear with this at the top:

Click Configure Now:

The computer's name will appear. In the 'Personal Key' enter any string of letters and numbers for a unique access code for the computer to be accessed (the shop computer).
On the Home ('Remote') Computer
- Using Google Chrome: When the download completes, click on the rectangle in the very-lower-left corner of the browser window to run the installation. Can't see a rectangle? Click on the square to the left of the X in the very-upper-right corner to maximize the screen.
- Internet Explorer or Microsoft Edge: Choose Run. Don't see Run? Click on the square to the left of the X in the very-upper-right corner to maximize the screen.
- Firefox: Use the down arrow at the upper left to go to the Downloads folder.
- Lost? To the right of the Windows Start Button type downloads to locate the Downloads Folder. Click on RemotePC.exe to start the installation.
Installation will place a desktop icon like this:
On the same webpage (https://www.remotepc.com/download.htm) choose Log In (upper right):

Use the same email address and password (as the host computer) to log in. Optionally check 'Stay logged in' if appropriate.
The host computer should be listed with its connection status. Click on Connect if status is 'Online'.
Enter the personal key for the host and press Connect.
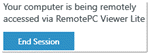
This popup will appear on the host computer to alert anyone there that the host is being accessed (with an option to end the session):
You should now see the host computer and can receive sound, record the session to a video file, transfer files, make sticky notes and chat. (Some features may not work if the host and remote computers have different operating systems.)
With the free version only one computer can be set up on the account (which is sufficient for most store owners). You can remotely access multiple computers. You just can't save the connection information to your computer.
RemotePC can be used through the iOS or Android app which can be downloaded from remotepc.com
Tech support of course would not be able to assist with configuring a mobile device.
Procedures for Connecting 2 Computers
Your computer's version of Windows is one of many. Each computer includes specific instructions for networking it successfully. Please go to Start > Help and search for networking. Microsoft has provided complete details and links for network setup, including a network wizard which will make auto-adjustments as needed for security.
Serial and parallel connections may be used to connect 2 and only 2 PCs. The Direct Cable Connection (DCC) provides lower performance but offers the same basic functionality as Ethernet cables. DCC is not suitable for networking BCSS. It is sufficient for copying BCSS files from one PC to another. This may be a preferable method if the cables are already available and speed isn't important.
USB - Do not use ordinary USB cables to connect computers. Electrical damage is probable. Use special USB cables designed for direct connection.
This option is preferable if computers lack Ethernet network adapters but it is not an acceptable configuration for using BCSS on a network. It is suitable for transferring data only.
Duplicate ID Warning
All databases sort numbers in order when the column only contains numbers. If the ID column has a mix of numbers and letters all databases sort the column as text, so 1,2,3,10 will appear as 1,10,2,3.
The program will keep track of the last number used and offer the next number in sequence when opening a new client record, new sale and so on. If an ID containing letters is subsequently used, the program will resort the column, lose track of the last-used number and issue a warning of "duplicate ID".
The solution: Close the new record. Sort the ID column. See which number was last used. Open the new record again. Edit the ID and use the next number. Complete the record entries.
Common Causes of Computer Problems
Please don't expect to resolve issues if the computer has not been properly prepared for commercial use. Almost all computers sold locally are intended for home use. They may have slower processors, insufficient RAM memory, inferior components... By all means avoid refurbished hardware.
Speed Up BCSS
From Microsoft: "The most common causes of corruption are bad sectors on storage media, lost clusters, cross linked files, malfunctioning anti-virus software, viruses, and system crashes. Although 99 percent of a file may be intact, a few missing or corrupted structures are enough to stop an application cold, leaving the user frantic and the IT professional in a jam."
- If the computer is running slowly or 'crashing', in all probability it doesn't have enough resources (RAM memory, hard disk/front-side bus/clock speed and/or the resources are being consumed by other programs. (There are other causes like viruses, spyware, damaged components...) Right click on the Taskbar and start Task Manager. Click on Processes. Click on the header for memory to sort programs by the amount of memory each is using and observe which are using the most. Next, click on start and type msconfig then click on Startup. These are all of the programs running in the background, using up resources. Most of them can be disabled. Consult with an IT tech or someone knowledgeable before stopping any of them. It's important to understand how a computer works before concluding that any software program is responsible for a computer 'crashing'.
-
 To speed things up, in Program Setup on the General tab, check 'Zero Quantity in Inventory Work Area List?' to only include unsold items in inventory in lists.
 - In the BCSS Inventory Work Area, select Batch Delete and delete old records.
- Choose Inventory then Storage and use the option to send items to Storage. (The size of the database won't be reduced but the items moved will not appear in list.)
- Consider paying tech support to permanently delete records prior to a date you provide. (The current database could be kept and reloaded if historical information is needed. Shrinking the database in this way will speed up processing.)
- Use the time filters to reduce the number of entries listed in the tables. Looking for a transaction from today? Click on 'Today':

- For remote computers on a network, in Program Setup, on the Inventory tab, turn Automatic Discounts off. On the General tab, set the auto backup time to 25:00 to prevent backups on remote stations.
- Increase the computer's RAM memory. You might want 4 GB for Windows 7/8/10 (for 32-bit). For 64-bit, much greater amounts of RAM are allowed and preferable.
- Perform a Disk Cleanup. (Go to Start and type disk. Select Disk Cleanup.) This removes unnecessary files (like temporary files) from the computer.
- Defrag the hard drive. (Start > Programs > Accessories > System Tools > Disk Defragmenter, or search Windows Help for defragment)
Your Computer
Almost invariably difficulties are caused by using:
- Laptops - which spin the hard drive about 25% slower than a desktop (to keep them from over heating). They can be suitable for business use if they have adequate resources (RAM memory, free hard-drive space, clock speed, front-side bus speed) and are in good working order (relatively new, free of malware/viruses and unneeded programs).
- Computers processors like Atom, Celeron, Centrino, Pentium - often found in laptops and 'off-the-shelf' computers. (See where your processor ranks, and test its speed.)
- Computers infected with viruses, malware, spyware, adware
- Computers with inadequate resources (free disk space, RAM memory, clock speed)
- Computers with corrupted Windows registries (causes error 1429)
- Windows Vista/7/8/10 - For BCSS (and most software) to run properly, the user must be logged into the computer as Administrator to install and run software, or users must be granted permission.
- Improper computer use, including no surge protector/power backup, leaving the computer plugged in overnight, shutting the computer off with the power button (vs. Start > Shutdown), stopping BCSS while it's performing a function...
- Other software programs. (Go to Control Panel, Programs (or Add/Remove Programs) and remove unused software. Be careful.)
- Other software programs. If BCSS was working and stops working, were other programs installed? Quite often the culprit is an update to another program (like an anti-virus program or Windows itself). When BCSS 'stops working' do a system restore. (See Windows help.)
- Too many printer drivers. (Go to Control Panel, Printers and delete all unnecessary entries.)
- Windows. It's a software program. Like any other it can and does become corrupted and needs to be reinstalled.
- Windows 7/8/10 User Accounts: Go to the Control Panel then User Accounts then 'Change User Account Control settings' and turn UAC off. Also, right click on the BCSS-Run Desktop icon. Select Properties and click on Advanced. Check 'Run as Administrator' and save the change. Click on the Compatibility tab and set all users to run the program as administrator.
- Computers at work should be dedicated to work functions. They certainly should not be used to download from the Internet, particularly from BitTorrent sites. If the computer is loaded with unnecessary software, runs too slow, crashes often - reformat the hard drive, reinstall Windows (preferably Win7/8/10) and give your computer a fresh start.
When a computer with one or more of the above afflictions is used in a commercial environment, it is the computer that becomes confused, overwhelmed and exhausted. It is the computer, not the software program, that 'locks up' and 'crashes'. There's nothing wrong with the software. This has been proven by over hundreds businesses currently using BCSS on commercial-grade, well-maintained computers.
System Requirements
- RAM Memory: XP: 512KB (1 gig preferred); Vista/Windows 7/8/10 (32-bit): 2-4 gigs; 64-bit maximums (not required for BCSS): Starter: 8GB, Home Basic: 8GB, Home Premium: 16GB, Professional: 192GB, Enterprise: 192GB, Ultimate: 192GB
- Clock Speed: 3GHz
- Processor: Pentium or AMD (Advanced Micro Devices) - never Celeron or Centrino
- Operating System: Windows XP or Vista with latest Service Packs
- Commercial grade surge protector
Poor Maintenance
'Disk Defragmentation' and 'Registry Repair' are necessary to keep hard drives and registries clean.
Internet Infections
If a computer is connected to the Internet, it must be protected from viruses, spyware, adware and malware. A slow-running or crashing computer are sure signs that the computer is infected.
Windows Security Updates must be performed frequently. Windows should be set to Updated Automatically once per day at a time when the computer is on. By default, automatic updates are set for 3 a.m. when most computers are off. (See Windows Help.)
Troubleshooting BCSS
Please don't expect to resolve issues if the computer has not been properly prepared for commercial use.
Difficulties sometimes arise when program files become corrupted. Corruptions can be caused by power surges or spikes, inappropriate closing of BCSS, hard computer shutdowns, poor downloads, low computer resources, electrical surges, lightning and so on. See Wikipedia's explanation of data corruption.
Fixing the Problem
The new FoxPro version of BCSS includes 2 options under Utilities to make it easy to resolve 'lock ups' and some minor glitches: Rebuild Database Indices and Reset Program. Please use these options to fix minor issues.
The next option is to exit BCSS and turn the computer completely off (not reboot) and retry the function that caused the problem. If the problem persists, restore the last data backup. (If data is backed up daily, data loss will be minimal.) If this resolves the issue, it means that the current database is corrupted and should not be used. If the program will open using the current database, any recent entries could be viewed, recorded and reentered using the backup database.
If using a previous database doesn't resolve the issue, update the BCSS program to the most recent version:
- Click on the link corresponding to your BCSS edition to obtain the latest version of BCSS. (Close BCSS and save the bcss.exe file in (C:\BCSS):
Restart BCSS. If the error still exists, try the last backup again.
BCSS was working. Now it doesn't.
If BCSS was working and now there's a problem, the cause could be any number of things. Unfortunately we can't be there at the time of the occurrence so we have to ask questions to find out what caused the problem. Was another program installed or updated in the interim? Was Windows updated? Are employees shutting the computer off with the power button or interrupting BCSS while it is processing? Electrical surge? (Is there a surge protector between the power supply and the computer?) Email us for free support (or contact Realize Technologies, ) when there's a problem. So far we've been able to fix most issues (in 14+ years).
Error 1806 indicates that the BCSS database has been changed and your files need to be adjusted. Please email support to arrange to have your program updated.
Error 1924 (Sale Form is not an object Line of code with error: Line number of error: 4409 Program with error: APP_TOPFORM.TOOLBAR.ERROR) - sometimes appears when attempting to enter a second sale. This is an indication of a corrupted program file. Please email support to arrange to have your program updated.
BCSS is locked after it has been unlocked.
"The resource file is not valid. Overwrite it with a new one yes or no? - It is safe to answer "Yes". The message should go away and no damage will be done to data files.
Email Function Doesn't Work. - Recent Windows Updates have broken the link in the email component used in BCSS. We are waiting for the author of the print preview component to fix it.
Printing Account History limited to 1 page - This was corrected in the 4/26/09 update, version 5.1.2486. Please contact support to update BCSS.
Help Email Work Properly
At first, spam was an annoyance, but when spammers started using email to send malicious viruses, email services had to turn up the spam filters.
If you have sent an email to us and didn't get a response (usually within 24 hours if not much sooner) here's one of the many possible reasons:
- Our email address was entered incorrectly.
- Your ISP's Spam Filters (Internet Service Provider) blocked our reply.
- Your ISP's IP Address is 'black listed'.
- Your Firewall's Spam Filters blocked our reply.
- Your Email Program's Spam Filters (Outlook, Pegasus, Eudora, etc.) blocked our reply or sent our message to your Spam Folder.
- Free Email Services Spam Filters (MSN, Hotmail, Gmail, Yahoo! etc.) blocked our reply (especially if it had an attachment) or sent our message to your Spam Folder. (Yahoo! is the worst.)
As you can see, there's a very good possibility that what appears to be a non response from us is often a matter of our not having received your email or you not having received our reply.
If you don't have a response from us to your email within 24 hours please resend your message to sales@bestconsignmentshopsoftware.com using a different email service. Go to Gmail (the better of the free email services) and set up a backup account for such purposes.
About Free Email Services
Free email services like AOL, MSN Hotmail and Yahoo! are not suited for business purposes because they have limited resources and functionality. To keep costs down they limit file sizes, often block file attachments and go way overboard on classifying emails as spam. Please don't use them for your business. Instead, contact your ISP (Internet Service Provider) and ask them to show you how to use your ISP email account. If it's necessary to use a free email service, Gmail is the best of the bunch, allowing attachments (up to 25MB compared to 2MB for others) and doing a better job of distinguishing good emails from bad. Google's spam filter is also much better at stopping spam emails before they reach the inbox.
Spam Filters
One of the ways software blocks emails is to block emails containing specific words or phrases. It's possible to receive several emails from a source but have one email blocked because it contained a 'poison word'.
Also, spam-blocking programs are 'heuristic' in that they (hopefully) 'learn' what is spam and what is not spam by analyzing received email messages. A sender of several emails could end up being blocked if the sender acquires enough 'points for spamming' when the sender is not a spammer. Spam filters are very dangerous. Please always check your Spam Box before deleting messages from it. Spam filters are far from 'perfect'.
If an email makes it past your ISP and your Firewall and your Virus-Protection Program, it still needs to pass muster with your Email Program's Spam Filters. (Free email services have overly-aggressive spam filters. Check with yours to see if you can control the level of spam filtering.)
Email Program Settings
If you make the settings below in your email program and are still having problems with blocked emails, contact your ISP to see if messages are being blocked there, or investigate your firewall or spam program (if any).
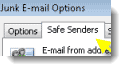
Safe Sender List
It is no long sufficient to add an email address to your address book to prevent messages from that email address from being blocked.
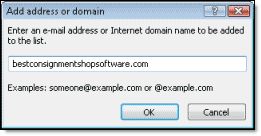
These days it is necessary to add email addresses and/or domain names to your email program's Safe Sender List (Allowed Sender List, White List) to try to prevent emails from those email addresses and domains from being blocked. Doing this also does not guarantee that every attempted email communication will be successful.
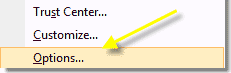
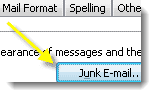
The following instructions are for Microsoft Outlook (Office 2007). Your views of your email-program screens will look different if you are not using this version of Outlook, but the general principles are similar:
|
Summary of Outlook Help:
In Email Setup:
Select 'Also trust e-mail from my Contacts check box' for all your Contacts to be Safe Senders.
Check 'Automatically add people I e-mail to the Safe Senders List' if desired.
By default pictures (images) in emails are blocked. Images in messages from or to Safe Senders and Safe Recipients will be allowed.
A .txt list of names and addresses may be imported. See Outlook Help for instructions.
Right-click on any message then click Add Sender to Safe Senders List or Add Sender's Domain to Safe Senders List.
Networking - Connecting Computers
(Available in Diamond and Virtual editions.)
What is a Network?
A network is linked computers sharing resources like data and printers:
Networking is a Microsoft Windows feature. Please refer to Windows Help (under the Start Button) for Microsoft's detailed instructions for configuring a network.
Running programs on a network requires knowledge and skills to correctly set up and maintain a network. Also required are commercial-grade (NIC) cards, routers, cables and computers.
Laptops and PCs purchased at local stores are usually configured for light home use and will not perform well on a commercial network. They can be used by shop owners tolerant of long wait times, computer/network crashes and data corruptions. See requirements.
Ease of networking has improved as Windows has progressed from XP. All computers on a network should have Windows 7 or higher. Windows' Network Wizard can be helpful.
Every computer should have the latest version of BCSS installed.
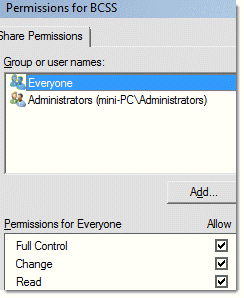
On a network, it may be necessary to grant 'Full Control' to groups of users (like 'Everyone').
Equipment
NIC Cards and Ethernet Ports
The computer's network card (NIC card) or Ethernet port (an NIC card integrated on the motherboard) allows access to the network or Internet to allow interaction with other computers.
Modern computers will have Ethernet ports. If not, install commercial-grade 3GB Network Adapters (Network Interface Cards or NICs) on all PCs.
Most 'off-the-shelf computers' will have a NIC card unsuitable for commercial use. They should be replaced with high-speed cards.The ports or cards must be high-speed and high-quality - not the ones typically installed on PCs for home and Internet use.
Make sure the cards or ports are working properly. The lights on the NICs or ports should be on when the computers are on.
Click on System in the Control Panel, then Device Manager. (Any exclamation point in a yellow circle indicates a hardware conflict and must be resolved.) Double click Network adapters. Right-click on the adapter. The Device Status Message must read 'This device is working properly'.
On the same screen, click on Power Management and UNCHECK 'Allow this computer to turn off the device to save power.'
1. If asked during NIC installation, enable DHCP.
2. Turn all computers off.
3. Connect all computers to a 5.0 GHz dual-band router with RJ45 cat6 or cat7 Ethernet cables.
4. Plug the router into its own power source.
5. Turn the host computer on, then turn on all remote computers.
6. Configure the router. Make sure DHCP is turned on. (See router instructions.)
Configure the router to assign an IP address to each computer so networks will function correctly. If this option was not made available during NIC installation, DHCP can be enabled in the TCP/IP configuration.
Hubs, Modems, Routers and Switches:
The router must be a 'dual-band' router. Given a choice, choose a Simultaneous Dual Band over a Selectable Dual Band. Simultaneous has twice the bandwidth and separate networks to avoid interference.
Routers can network up to 8 computers in a Local Area Network (LAN). For larger databases and more than 2 computers on one network use 10GBase-T routers and NICs.
Suggested model: Linksys EA9300 Wireless Router - 2.4 GHz (1 band) / 5 GHz (2 bands) - Gigabit Ethernet
Many new routers are configured through the browser. Router documentation explains how. Cisco routers come with extensive documentation. Linksys is a better trouble-free brand. Linksys' setup through the browser is very comprehensible.
The Linksys setup will have DHCP in two places - one for the connection that it makes to the Internet and the other for connection to client computers on the local network. The latter needs to be enabled. In the Linksys configuration, it is only necessary to enable DHCP and specify a starting IP address. Other configuration items on the DHCP page can be left as they are.
Hubs, modems and switches are not routers. Routers are built for networks. Hubs and switches are older technology and modems are for connecting computers to the Internet.
If your Internet modem has multiple Ethernet connections, it may be possible to network computers through the modem but a modem will be slower than a dual-band router.
Suggested router: Linksys EA7500
Wireless Network
Wireless may be sufficient for transferring data from one PC to another, but it is totally unsuitable for connecting computers in a business environment where large amounts of data are being transferred. A wireless connection is incapable of providing the degree of dependability that businesses require. Wireless connections result in poor connectivity, lost connections and damaged data.
Cables
Cables are used to connect each computer to the router. They can be up to 300' in length.
Ethernet straight-through cables are necessary to achieve gigabit speed. Cat 6, 7, 8 or 9 cables have 8 wires (four pairs). Older Cat5 cables have only 4 wires so they are much slower and they don't reduce cross-talk noise enough between wires at high speeds.
Crossover Cables are used to connect one computer directly to another and should only be used for direct network connections. In particular, attempting to connect a computer to a hub with a crossover cable will prevent that network link from functioning. Broadband routers have become an exception, detecting crossover cables and allowing them to function with other types of Ethernet devices.
Computers
The Server (aka host, main) is the most important computer on the network. Avoid laptops, Atom, Celeron, Centrino and Pentium chips. This is one area where it will not pay to cut corners. Shoot for an Intel quad-core Core i7 processor or a high-end AMD-8000 processor.
Here is a comparison of different processors: https://www.cpubenchmark.net/common_cpus.html
Remote-Station Computers should have the same OS (operating system, Windows) as the server. The power requirements aren't as important as the server. 4GB of RAM and a clock speed of 3.0GHz or better are minimal. The most important issues will be computer condition and the speed of the dual-band router and computer Ethernet ports (which should be 3GB or better). Laptops can be used on remote stations but expect slower performance.
Windows OS: Use Windows 7/8/10. Avoid Vista and XP if possible. All machines should be running the same version of Windows. (It is possible to run mixed versions but with possible complications.)
To increase speed on each computer, remove all unnecessary programs (including updates), stop programs from starting at startup, turn off Windows Indexing.
There is a little-known 'Super Administrator Account' in Windows. Although you may be logged into Windows as Administrator, you may still not have full command over the computer. See Super Administrator. This is more likely if the computer was acquired 2nd hand or was a demo in a retail store.
- On the host computer click on Start then Computer then C:. Right click on the BCSS folder and select 'Share With' then 'Specific People'. Click on the Down Arrow, select Everyone and click Add. Click on the Down Arrow next to 'Read' and select 'Read/Write' then Share.
- On the host computer right click on the BCSS folder > Properties > Sharing > Advanced Sharing > Permissions. Select Everyone. Set Permissions to 'Allow' (or 'Full Control' on some machines) then OK:
Setting Up a Network
- On the Host Computer and Remote Computers - Go to Control Panel, Network and Internet, Network and Sharing Center > Advanced Sharing Settings. Click on the arrow to the right of Public. Turn on all options except 'password protected sharing'. Scroll up and click on the down arrow to the right of 'Home or Work'. Turn on all options except 'password protected sharing'.
- If Windows logon ID's and passwords have been assigned, make sure that all LOGIN ID's have Administrator access.
Test all network computers to make sure that they can access the other computers.
Networking is a function of Microsoft Windows (which provides useful links and a network wizard in Windows Help). The support we provide relates to our software and how it is to be configured after the network is operating correctly.
It is of course impossible to visually configure and troubleshoot hardware and connections from a remote location. You'll need a knowledgeable local technician to setup and troubleshoot the network.
Using BCSS on a Network
Preparations:
Turn Automatic Discounts off on POS stations: Go to File > Program Setup > Inventory and uncheck 'Process discounts and transfers automatically'.
On all POS stations, in Program Setup > General Tab, set the time for daily backup to 25:00.
On a network only use the main PC to send data to tech support and/or back up data. Use 'Send Data to Support' (under Utilities). Weak Internet? Use a free service like wetransfer.com and send the files to sales@bestconsignmentshopsoftware.com.
Avoid using batch enter and batch edit on more than one computer but when that is necessary, don't leave either the batch-enter or batch-edit screen open and inactive on any other computer.
BCSS Site IDs must not be entered on remote stations.
Reports will only show data that has been saved. If a user is entering changes and has not saved them, the changes will not appear.
Requests and updates can be made simultaneously without sharing violations from all the computers on the network.
BCSS Configuration
On the host computer open BCSS and go to Files, Program Setup, Networks. The location of the BCSS database by default is the BCSS program directory at C:\BCSS.
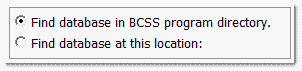
(If the database is in a different location, check 'Find database at this location:' and use the 'Find' button to set the location.)
Click Save to save settings and continue working in Program Setup or click Save/Exit to save and exit.
Software Registration
On the host computer in Program Setup > General, enter the Site ID and the password (provided by support).
Do not enter Site IDs on remote stations.
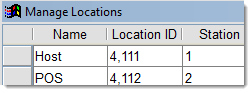
Setting Locations on the Host
A 'Location' is each computer's 'place' on the network.
- On the host in BCSS go to Program Setup > Network and click on Manage Locations.
- Enter 'Host' as the Name on the first line.
- Enter the Site ID for the Host (provided by support) as the Location ID.
- On the next line, enter a name for a remote station and its Site ID.
- It is not necessary to enter Station IDs as shown here but doing so could be helpful:
Setting Locations on Remote Stations
- On each remote computer go to the Network page in BCSS Program Setup ( File > Program Setup > Networks).
- Click on 'Find database at this location':

A Windows Navigation Screen will open.
- Click on Network. (It may be necessary to scroll up/down to see Network.)
- Click on the BCSS shared folder. The pathname may look something like:

(If the BCSS folder on the host computer is not present, it needs to be shared.) - Click Open.
- Save/Exit.
- Reopen BCSS and go to Program Setup > Network Tab.
- Click on the down arrow to the right of 'This computer's location is'.
- Select the location for the station.
- Click Save and Exit.
- Close BCSS and reopen it.
The data displayed should be the same as is on the host. If not, close the program on the station and reopen it.
Please note: On remote stations the Store ID and password MUST NOT be entered in Program Setup > General Tab.
Confirm the Remote Connection to the Host
- Enter a test sale in BCSS on the remote station.
- On the host go to the Sales Work Area.
- Click Today:

The sale entered on the remote station should appear on the host.
Troubleshooting
Cannot Change Permissions | Settings Won't Save
First, take a look at this video.
If entries won't save in BCSS it's likely that Windows is having a problem with 'permissions'. There are known issues, all of which have been addressed:
Configure the BCSS Desktop icon on each computer to run as Admin. (Right click on the icon. Select Properties then Advanced. Check 'Run as administrator'.)
If that doesn't resolve the Windows issue, see Super Admin.
If this does not resolve the issue, it may be necessary to seek the assistance of an IT tech, or take the computer back to where it was purchased for service.
Invoice-Number Skipping and Duplications
BCSS assigns an 'Internal ID' to every record. To prevent duplicate records or missing (skipping) invoice numbers, every computer on a network must be designated in BCSS by 'location' (like Main Computer, POS-1, etc.). (Instructions)
![]() Speed on stations will be determined by:
Speed on stations will be determined by:
- Each computer's processing power (clock rate or clock speed and RAM memory)
- The size of the database files
- The capacity and condition of the network components (NIC Cards/Ethernet ports, Cables, Router)
- Network configuration (Networks using Internet modems will be inherently slower.)
- The number of computers on the network.
BCSS will be faster on the host because the host is working with BCSS from the hard drive. Processing on stations will be slower because stations are working with BCSS through the network. If it is suspected 'the software' is causing delays, do this on any POS station:
- Literally time a function on the POS station that is 'slow'.
- In Program Setup > Network Tab change the location of the database to:

- Use 'Restore Data' to bring the data from the host computer to the POS station. (In BCSS, under Utilities, use 'Restore Data' and point to the BCSS folder on the main computer.)
- Open BCSS and perform that same function in step 1.
The function will take far less time on the POS station (with the same BCSS data) because it will have accessed the database from the hard drive as opposed to retrieving the data through the network.
Advantages of Networking
- Speed. Sharing and transferring files within Networks saves time while maintaining the data integrity (assuming the network is adequately powered with commercial-grade equipment).
- Cost. Individually licensed copies of many popular software programs can be costly. Networkable versions are available at considerable savings.
- Security. Sensitive files and programs on a network can be password protected.
- Sharing. Internet connections, printers, fax machines and modems can be used by multiple computers on the network.
- Electronic mail on a LAN allows communication without having to leave the work area or desk.
- Flexible Access. Files may be accessed from any computer on the network.
- Workgroup Computing. Workgroup software (such as Microsoft BackOffice) allows many users to work on a document or project concurrently.
Network Types
The 'type' of network generally refers to the physical area the network covers. LAN and WAN are the original categories of area networks while others have emerged:
- CAN - A Campus Area Network (Controller Area Network or Cluster Area Network) is a network spanning multiple LANs but smaller than a MAN such as on a university or local business campus.
- DAN - Desk Area Network
- LAN - A Local Area Network connects network devices over a short distance. A networked office building or home usually contains a single LAN, though sometimes one building will contain a few small LANs (perhaps one per room), and occasionally a LAN will span a group of nearby buildings. In TCP/IP networking, a LAN is often but not always implemented as a single IP subnet.
- MAN - A Metropolitan Area Network is a network spanning a physical area larger than a LAN but smaller than a WAN, such as a city. A MAN is typically owned an operated by a single entity such as a government body or large corporation.
- PAN - Personal Area Network
- SAN - A Storage Area Network connects servers to data storage devices through a technology like Fibre Channel.
- SAN - A System Area Network (Cluster Area Network) links high-performance computers with high-speed connections in a cluster configuration.
- WAN - A Wide Area Network spans a large distance (like the Internet spanning the Earth). A WAN is a geographically-dispersed collection of LANs. A network device called a router connects LANs to a WAN. In IP networking, the router maintains both a LAN address and a WAN address. A WAN differs from a LAN in several important ways. Most WANs (like the Internet) are not owned by any one organization but rather exist under collective or distributed ownership and management. WANs tend to use technology like ATM, Frame Relay and X.25 for connectivity over the longer distances.
- WLAN - A Wireless Local Area Network is a LAN based on WiFi wireless network technology. (not recommended for commercial use)
Windows Limitations
Below are network-shared limitations of Windows.
XP
Home: 5 Simultaneous Peer Network Connections
Pro: 10 Simultaneous Peer Network Connections
- Vista and Windows 7 users count as 2 connections.
Vista/7/8/10
Home Basic: 5 Simultaneous Peer Network Connections
Home Premium/ Ultimate: 10 Simultaneous Peer Network Connections and 5 Media Center Extenders
Business / Enterprise: 10 Simultaneous Peer Network Connections
PC Maintenance
Please don't expect to resolve issues if the computer has not been properly prepared for commercial use.
If your computer doesn't run like it did 'out of the box', it probably has insufficient RAM memory, fragmented and unnecessary files, lost disk space, malware infections, displaced memory and possibly a corrupted system registry.
If your PC is or has been connected to the Internet and it a) wasn't protected by a anti-virus program, or b) only has 'free anti-virus software, it is assuredly infected with adware, malware, spyware and viruses which cause PCs to run slower and 'crash' or 'lock up' often. These days even Norton, McAfee and PC-cillin are often unable to stop all computer attacks, so it's best not to use any PC for business that has been online unless it is reformatted and kept offline, or at least protected by ESET.
Poorly-maintained PCs cannot run database software dependably.
Below are many time-consuming steps to be done manually.
1) A primary cause of slow PCs is insufficient space in virtual memory (RAM - Random Access Memory). That's an area where your computer temporarily stores bits of data (miraculously on electronic impulses) where the data is accessed incredibly more quickly than reading and writing data from the much slower hard drive. For 32-bit machines, have the maximum RAM allowed. For 64-bit machines have at least 4-8GB.
2) Download a free version of ESET and perform a virus scan and Security Check. Free anti-virus programs are not adequate protection.
3) VERY IMPORTANT! Microsoft's Windows software program is like every other - in constant need of updating. Every Windows version must be updated regularly! Click on Start then 'Windows Update' to access. If that shortcut is not available, try Start, Programs, Accessories, System Tools, Security Center and set 'Automatic Updates' to 'On'.
4) Remove unnecessary files: In XP go to Start, Programs, Accessories, System Tools, and click on Disk Cleanup. (Win7/8/10: Start > All Programs > Accessories System Tools > Disk Cleanup, or click Start. Type Disk Cleanup in the Search Box and click Disk Cleanup.) This will check your hard drive thoroughly for unnecessary files on the hard drive. Select which files to delete. Reboot. (Alternatively, find the defrag utility by opening Windows Help (Start > Help) and search for cleanup.)
5) Remove unnecessary programs: Go to Control Panel and select (XP) Add/Remove Programs or (Vista/7/8/10) Programs. Uninstall all programs that are not needed for business. Do not remove programs if you aren't sure they aren't needed. Search Google for the name of the software for identification and information.
6) Prevent programs from running unnecessarily when the computer starts up. Go to Start, Programs then Startup. Delete all entries. This only deletes shortcuts to programs. It does not delete programs. Programs that run at startup deplete RAM memory making computers run slower.
7) Run CheckDisk: Go to Start then Run. Type chkdsk /f. A black screen may appear asking if you want to run CheckDisk upon reboot. Type Y then press enter. Reboot. CheckDisk will run and present a report when finished.
8) Run Disk Defragmentation.
9) Install the Correct Version of Windows 7/8/10. With a high-end PC with more than 4GB of RAM, use the 64-bit version of Windows. 32-bit doesn’t use memory above 4 gigs.
10) Updating the main system drivers (graphics card, chipset, audio and more) will maximize the benefit from any performance enhancements and bug fixes. Periodic driver updates will be provided automatically through a Windows 7/8/10 update.
11) File indexing works by extracting information from documents and other files on your hard drive and creating a 'searchable keyword index'. This slows the system. Disable it. This can take a long time so do it as a last task for the day:
- Double-click the My-Computer icon.
- Right-click on the C: Drive. Select Properties.
- Uncheck 'Allow Indexing Service to index this disk for fast file searching'.
- Apply changes to 'C: sub folders and files' and click OK.
- If 'Access is denied' click 'Ignore All'.
13) Reboot.
Now your computer should have more disk space and more available RAM memory and no viruses. BCSS and other programs will have a better chance of running successfully. Also, as a computer and printer are used, their resources (like RAM or buffer memory) are reduced. Restart the PC and printer regularly to restore their capacities.
PC Transfer
Important Note: Transferring BCSS to another computer creates additional work which is not included in 'free support'. Invariably if 'your tech guy' will be involved, our tech support will still be called upon to assist so it may be best to not involve a 3rd party and have to pay 2 technicians.
The transfer fee ($49) may be paid online at bestconsignmentshopsoftware.com/remit.htm
. Just enter 49 (without a dollar sign) in the field named 'Enter an Amount' and press the Blue Order Button to continue, then send an email stating that the payment has been made and the reason for the submission (PC transfer).
Procedures for transferring to another computer:
- Create a backup of the current BCSS data to a flash drive. If a drive is not available, use other methods (belows) for getting a copy of the BCSS database to the new computer.
- Windows Vista/7/8/10 - For BCSS (and most software) to run properly, the user must be logged into the new computer as Administrator to install and run software, or users must be granted permission.
- Windows 7/8/10 User Accounts: Go to the Control Panel then User Accounts then 'Change User Account Control settings' and turn UAC off.
- Type 'power plan' in the Windows search box.
- Select 'edit power plan'.
- Set the display and computer to 'never sleep'.
- Save changes.
- Download your edition of BCSS clicking on one of these links and save the file to the computer: Download Intro Download Deluxe Download Diamond Download Virtual
- Run the installation. Windows will probably require at least one reboot.
- Right click on the BCSS-Run Desktop icon. Select Properties and click on Advanced. Check 'Run as Administrator' and save the change. Click on the Compatibility tab and set all users to run the program as administrator.
- In BCSS under Utilities choose Restore Data.
- Navigate to the folder containing the BCSS database.
- Choose Save. The data should appear in BCSS.
- Close the program and reopen it.
BCSS on the new computer will be in 'demo mode'. The registration of BCSS from the original computer will need to be transferred to the new computer. Send an email to sales@bestconsignmentshopsoftware.com requesting software registration.
After the software registration transfer, the program will cease to open on the original computer.
BCSS Version # and Edition
The software version appear in the upper left corner in BCSS. In this example the version is 6.0.3677:

The BCSS edition is Virtual in this example.
If your version is lower than 6.0.3333 it will be necessary to send your database to tech support for adjustment. Please follow these steps:
- Backup your data.
- Send an email to sales@bestconsignmentshopsoftware.com along with your name and BCSS edition (Intro, Deluxe, Diamond or Virtual). Put 'PC Transfer' in the Subject followed by your shop's name.
- Include a note that you wish to update and have uploaded your files.
Please do not add/change data in BCSS until your files are returned to you. (You can look up information, print labels from existing entries, etc. but no new entries should be made and no existing data should be changed because those changes won't be in the files that are returned to you.)
- Go to the download page and save the appropriate installation file to the Desktop.
- When files have been returned to you, run the installation file to uninstall BCSS.
- Run the installation file again to reinstall BCSS.
- Unzip (to the Desktop) the file that was sent to you from tech support.
- Use the Data-Restore function (under Utilities in BCSS) to restore your data from the unzipped folder (on the Desktop).
- Restart BCSS.
If there's an issue send an email to sales@bestconsignmentshopsoftware.com along with your name, shop name, BCSS edition (Intro, Deluxe, Diamond or Virtual) the error message(s) (if any) and the actions that produce the error. Please be specific.
If the version number of your program is 6.0.3333 or higher -
- Backup BCSS data from the original computer.
- On the destination computer go to the download page and save the appropriate installation file to the Desktop. (If an Internet connection is not available on the destination computer, download the installation file on a computer that is connected to the Internet, save the installation file to a flash drive and install BCSS from the flash drive on the destination computer.)
- Pay close attention to what your browser does next. Choose 'Save' (not 'Run') and choose the Desktop as the location on the computer to save the installation file. (Chrome and FireFox may place the installation file in your user's downloads folder without asking you.)
- Run the installation file to install BCSS. (Windows may require that the PC be rebooted.)
- Restart BCSS.
- Under Utilities in BCSS, select Restore Database.
- Point or navigate to the folder on the flash drive containing the data files.
- Click Save. (The data will be imported into BCSS.)
- Find the Serial # under Help (Program Registration) and copy/paste it in an email to sales@bestconsignmentshopsoftware.com along with your name, shop name and BCSS edition (Intro, Deluxe, Diamond or Virtual). (Be sure to copy/paste to avoid read/write errors. Support will reply with an unlock code.)
- Copy/paste the unlock code into the Unlock-Code field and click on Unlock to remove the demo time limitation.
When settings won't save it's because Windows is blocking the entries from being saved in the Windows Registry. Here's what to do:
- Backup your data.
- Go to Start, Control Panel, User Accounts.
- Click on Change User Account Control Settings.
- For Win7/8/10, drag the slider down to the last position (Never notify) and click OK.
- For Vista, uncheck 'Use User Account Control (UAC) to help protect your computer' and click OK.
- Close the Control Panel.
- Right click on the BCSS Desktop icon named BCSS Run.
- Select Properties.
- On the Shortcut tab click on the Advanced tab.
- Check 'Run as administrator' and click OK twice to close out.
- Run BCSS. Settings should now be allowed.
If there's an issue send an email to sales@bestconsignmentshopsoftware.com along with your name, shop name, BCSS edition (Intro, Deluxe, Diamond or Virtual) the error message(s) (if any) and the actions that produce the error. Please be specific. Tech support will return your files with corrections. Please do not use BCSS until your files are returned to you.
Send Data to Support
About Data Files
All of the information entered into BCSS is stored in 'data files' (on the hard drive in the 'BCSS Program Folder', C:\BCSS. (In older editions the location was C:\Program Files(x86) or C:\Program Files.)
Data should be backed up daily.Data files may need to be sent to tech support for repair or update -
- Data files sometimes becomes damaged or corrupted by power interruptions, surges or spikes, hard shut downs, closing BCSS while it is processing, faulty motherboard/memory, viruses, malware, insufficient computer resources (like RAM memory) and a long list of causes.
- Data files become outdated as program features are changed and added.
Sending Data Files to Tech Support
Note: With version 6.0.3600 the Send-Data Button has been replaced with automatic daily backups.
If the Send-Data Button is not present (or if the Internet connection is too slow), zip your last BCSS data folder and email your data files to consign@usa.com (if the files are less than 2MB) or send them using a free online file-transfer service called WeTransfer. (Free email services like AOL, MSN and Yahoo probably won't allow transferring files of size using their services.)
Send your data files to support after the close of business on the day prior to the day your shop will be closed. That way, when your files are returned to you and restored, you won't lose newly-entered or changed data. Of course if there's a problem and the program can't be accessed, send the files asap.
Don't add, change or delete information in the program after sending files to tech support. It's ok to print labels for existing items, look up information, produce reports, etc.
Inventory and consignor information can be added to spreadsheets then imported into the program after files from tech support have been applied.
How to Email Data Files to BCSS Support
Free email services like AOL, MSN, Hotmail and Yahoo aren't good choices for business purposes. They send good emails to spam/junk/trash folders and block attachments. If you use any 'free email service' and have expected to receive an email from anyone, check spam/junk/trash folders.
Google Mail (GMail) can be ok. Instead of the usual 2MB attachment limit, Google allows 25MB and is generally more reliable in distinguishing between desirable emails and spam.
Businesses should be using commercial-grade email services. In most cases the ISP that provides the Internet connection also provides email accounts.
- If you are using AOL, MSN, Hotmail or Yahoo, don't attempt to email files. User WeTransfer instead.
- For reliable email services, open a new email message. Enter consign@usa.com in the To: Field (or click on the link to open an email addressed to that address).
- In the message enter your name, the name of the person who purchased BCSS, shop name, BCSS edition (Intro, Deluxe, Diamond or Virtual) and version. The number looks something like 6.0.3333 and is displayed in the upper-left corner of BCSS. If the program can't be opened, hover over C:\BCSS\bcss.exe to view the version #.
- Also in the message include issues to be addressed. Include error messages, if any, and actions taken that produced the error(s). Use Window's Snipping Tool or your cell phone to take images and send them to consign@usa.com (instead of typing error messages out).
- Attach the new zip file of your data to the email. (See your email program's instructions for how to attach a file to an email. In most cases just click on Attach a File, find and select the file and click OK or Open.)
- Send the email.
- Add usa.com to your email program's Approved Senders List or White List to lessen the chance that spam filters will block our replies to you.
Your data files will be emailed back to you as a .zip file attachment, or you will receive a link to download large files from our server. Simply click on the attached .zip file. Your computer should have an 'unzipping program' for unzipping the files and placing them in the BCSS Data Folder (C:\BCSS or C:\Program Files(x86) or C:\Program Files\BCSS).
Free email services like Gmail, Hotmail, Yahoo and AOL are not suitable for business purposes in that they often block attachments, particularly if attachments are large in size (as your data file may be according to them). Gmail.com is the 'best of the worst' of free email providers. Please contact your Internet Service Provider and ask them to help you configure your email program to receive and send email. Meanwhile, go to wetransfer.com and use their free service for sending large attachments.
Free Data Transfer Service
If your file is larger than 2MB and under 100MB send the file using WeTransfer.
- Zip your data file.
- Go to https://wetransfer.com and select 'Take me to Free' then 'I agree'.
- Select 'Add your files' then navigate to the zipped file and select it.
- For 'Email to' enter consign@usa.com.
- Enter your e-address.
- In the Message Box, enter your name, shop name, error message(s) if any and actions taken just prior to the message(s) appearing.
- Press 'Transfer'.
- Wait for the verification that the files has been sent.
- Tech support will receive the message you sent with your data files attached.
- We will inspect your files and return them to you with instructions.
How to Create a Data Folder Zip File
- In BCSS under Utilities, click on Backup Database Locally.
- In the next window, find 'Desktop' in the left menu and double click on it.
- On the top of the window to the right of the Look-in Field, click on the New-Folder icon.
- Type BCSS Data 7-7-18 (changing the date to today's date). (If Windows named the folder 'New Folder' press F2 to reopen the folder name and type in the suggested name.)
- Click Open.
- Click Open again. A message will appear confirming that the backup has been completed.
- Close the message window.
- Go to the Desktop and right click on the folder just created.
- Select Send To.
- Select Compress Zip File (or something similar, depending upon your Windows version).
- The new 'zipped folder' will appear on the Desktop. This is the folder that is to be attached to an email to consign@usa.com.
Settings Don't Save
Even though you may be logged into Windows as Administrator, Microsoft's User Account Controls may prevent settings in BCSS from being saved in the Windows Registry. Turn UAC off to convince Windows that settings should be allowed.
1. Go to Start, Control Panel, User Accounts.
2. Click on Change User Account Control Settings.
3. For Win7/8/10, drag the slider down to the last position (Never notify) and click OK.
4. For Vista, uncheck 'Use User Account Control (UAC) to help protect your computer' and click OK.
5. Close the Control Panel.
6. Find the desktop icon for running the program, named something like BCSS Diamond Run.
7. Right click on it and select Properties.
8. On the Shortcut tab click on the Advanced tab (lower right).
9. Check 'Run as administrator' and click OK.
10. Click on the Compatibility tab.
11. Click on 'Change settings for all users' (at the bottom).
12. Check 'Run this program as an administrator'.
13. Click OK.
14. At the bottom, check 'Run this program as an administrator'. (It may be checked already.)
15. Click OK twice to close out.
Super Administrator
On a network only use the main PC to send data to tech support and/or back up data. Use 'Send Data to Support' (under Utilities) or in older versions use the Send-Data Button. Weak Internet? Use a free service like wetransfer.com and send the files to sales@bestconsignmentshopsoftware.com.
Duplicate Numbering can be avoided by assigning a 'location' for each station.
It is also helpful to avoid using batch enter and batch edit on more than one computer but when that is necessary, don't leave either the batch-enter or batch-edit screen open and inactive on any other computer.
Networking BCSS
BCSS must be installed on all computers on the network. The strongest computer should be the 'Host' ('main' or 'server') because it will house (host) the BCSS database. The other computers on the network (POS stations, remotes) will access the database on the host through the router.
Speed on stations will be determined by:
- Each computer's processing power (clock rate or clock speed and RAM memory)
- The size of the database files
- The capacity and condition of the network components (NIC Cards/Ethernet ports, Cables, Router)
- Network configuration (Networks using Internet modems will be inherently slower.)
- The number of computers on the network.
BCSS will be faster on the host because the host is working with BCSS from the hard drive. Processing on stations will be slower because stations are working with BCSS through the network. If it is suspected 'the software' is causing delays, do this on any POS station:
- Literally time a function on the POS station that is 'slow'.
- In Program Setup > Network Tab change the location of the database to:
- Use 'Restore Data' to bring the data from the host computer to the POS station. (In BCSS, under Utilities, use Restore database and point to the BCSS folder on C: on the main computer.)
- Open BCSS and perform that same function in step 1.
The function will take far less time on the POS station (with the same BCSS data) because it will have accessed the database from the hard drive as opposed to retrieving the data through the network.
If the network is not up to speed, call on a networking specialist.
The tech should recommend a 'dual-band router' with 5.0GHz channel capacity. (Search online for the make/model of your router to see if it is a single-channel 2.4GHz router.)
If performance is insufferably slow, it may be time to contact tech support for a data trim.
Getting Help
Networking is a function of Microsoft Windows (which provides useful links and a network wizard in Windows Help). The support we provide relates to our software and how it is to be configured after the network is operating correctly.
It is of course impossible to visually configure and troubleshoot hardware and connections from a remote location. You'll need a knowledgeable local technician to setup and troubleshoot the network.
Setting Up a Network
Modern computers will have Ethernet ports. If not, install commercial-grade 3GB Network Adapters (Network Interface Cards or NICs) on all PCs. The ports or cards must be high-speed, high-quality cards - not the ones typically installed on PCs for home and Internet use.
Make sure the cards are working properly. The lights on the NICs (on the back of the computers) should be on when the computers are on.
Click on System in the Control Panel, then Device Manager. (Any exclamation points in a yellow circle indicates a hardware conflict and must be resolved.) Double click Network adapters. Right-click on the adapter. The Device Status Message must read 'This device is working properly'.
On the same screen, click on Power Management and UNCHECK 'Allow this computer to turn off the device to save power.'
1. If asked during NIC installation, enable DHCP.
2. Turn all computers off.
3. Connect all computers to a 5.0GHz dual-band router with RJ45/cat6-7 Ethernet cables.
4. Plug the router into its own power source.
5. Turn the host computer on, then turn on all remote computers.
6. Configure the router. Make sure DHCP is turned on. (See router instructions.)
Configure the router to assign an IP address to each computer so networks will function correctly. If this option was not made available during NIC installation, DHCP can be enabled in the TCP/IP configuration.
7. Configure each computer for networking.
- On the Host Computer and Remote Computers - Go to Control Panel, Network and Internet, Network and Sharing Center > Advanced Sharing Settings. Click on the arrow to the right of Public. Turn on all options except 'password protected sharing'. Scroll up and click on the down arrow to the right of 'Home or Work'. Turn on all options except 'password protected sharing'.
- If Windows logon ID's and passwords have been assigned, make sure that all LOGIN ID's have Administrator access.
8. Test all network computers to make sure that they can access the other computers.
Network Management
Reports will only show data that has been saved. If a user is entering changes and has not saved them, the changes will not appear.
Requests and updates can be made simultaneously without sharing violations from all the computers on the network.
Troubleshooting
Cannot Change Permissions | Settings Won't Save
First, take a look at this video.
Super Administrator
If that doesn't resolve the Windows issue -
Prior to Vista, the Administrator account was not hidden and users logging in as Administrator had full rights over the computer. Microsoft changed that in Windows Vista and 7/8/10 by adding a hidden 'Super Administrator Account' and subjecting the admin account to User Account Controls (which often prevent changes to the computer). This addition was an important feature for users like retail stores with demo computers on display. The feature could allow the store to keep demo users from downloading/installing potentially harmful programs or making disabling changes to the computer's settings. For everyone else, it's a pain in the neck, partly because the 'Super Administrator Account' has been kept secret.
If you are logged into Windows and can't change access permissions, settings won't save and/or folders can't be shared, try this:
- Go to Start > All Programs > Accessories.
- Right click on 'Command Prompt' and select Run as Administrator.
- At the command prompt type 'Net user administrator /active:yes'. yes
- Reboot the computer.
- The 'Super Admin Account' will now appear as an option at Windows login. (A password can be set for it.)
- Use that account to log in (with full rights over the computer).
- Changes on the computer should now be allowed.
If this does not resolve the issue, it may be necessary to seek the assistance of an IT tech, or take the computer back to where it was purchased for service.
Invoice-Number Skipping and Duplications
BCSS assigns an 'Internal ID' to every record. To prevent duplicate records or missing (skipping) invoice numbers, every computer on a network must be designated in BCSS by 'location' (like Main Computer, POS-1, etc.).
- Location designations in BCSS are not necessary if two computers are in use and:
- one is processing sales only and nothing else, or
- only one is used at a time.
- With two locations processing sales, one location will use odd-numbered invoices and the other will use even-numbered invoices.
- A location can be designated as 'None' but this should not be done if the computer will be processing any type of transaction (inventory entry, sales, settlements…) that another computer will be transacting.
- Invoice numbers will be skipped if nonexistent locations are registered on the host computer.
Every now and then reminders are helpful:
- The price for BCSS was much lower because price wasn't padded with pre-payment for support.
- Great! Everyone loves a discount!
- No monthly or annual payments for support.
- Super! No one likes to be forced to pay for something he or she may not need or want.
- Updates are free.
- Very generous considering that most software vendors charge for updates.
- Software update are unconditional.
- Very fair, considering you could have purchased a competing program where software updates are denied if annual support fees aren't paid.
- Free help was included (often prior to purchase) and should have been limited to 30 minutes.
- Very generous considering the price was already well below other programs.
- Training videos were made available to assist with learning.
- Another plus! Other software vendors charge extra for their 'training videos
'.
- Another plus! Other software vendors charge extra for their 'training videos
- A detailed illustrated user's guide is readily accessible by pressing F1 in the program or by pressing the 'Red P' on the desktop named BCSS Help.
- Free help is available from distributors of hardware:
- POS-X scanners, drawers and receipt printers: 800-790-8657
- TSC label printer: 657-220-7995
- Thermal labels: Barcode Warehouse (888-422-9249)
Looks like every effort has been made to make it possible for shops and employees to avail themselves of 'free support'!
In Summary:
- Every effort has been made to make owners and employees self sufficient.
- There has been no payment for personal support.
- Payment is expected when personal support is rendered.
Personal support is available via phone, chat, text, remote-PC access and email. When requesting assistance, please be prepared to remit payment.
What Computer Should You Have?
BCSS speed and efficiency are only limited by a PC's storage capacity, Windows version (XP, Vista, Windows 7/8/10), processor, RAM memory and PC 'health'.
Shops with a few thousand inventory entries should have at least 8 gigabytes of RAM for 64-bit Windows 7/8/10. (Maximum RAM for 32-bit machines is 4 GB.) XP and Vista machines will work in very small shops.
For large operations with more inventory items, greater horsepower is needed: 3.5 GHz Intel Core or AMD processors - not Atom, Celeron, Centrino or Sempron chips and 8-32 GB for Vista or Windows 7/8/10.
Laptops have slower hard drives (to avoid over heating), so they naturally run slower, but they can still function properly given enough RAM memory (8 GB) and clock speed (3-4 GHz).
Symptoms of a PC with Inadequate Resources
Computers run their best 'out of the box'. As programs are installed and files are stored, PCs start to slow down. Computers connected to the Internet become cluttered with 'temporary Internet files' and without adequate protection, they become infected with viruses and several forms of 'malware'.
If a PC is running slowly, perform PC Maintenance. If the problem persists, bring RAM up to 16 gigs for higher Windows editions. (It's easiest to take the PC to a local store that sells and installs computer memory, and it's low cost.) Adding more RAM however is not going to make a 16-year-old mare run like a 3-year-old thoroughbred.
Software - The Operating System
Microsoft Windows is an 'operating system' (OS). It is an interface between hardware and other software on the computer. In other words, it makes the computer 'run'. For most computer users, Windows Vista is difficult to use. Consider reformatting the hard drive and install Windows 7/8/10.
Windows 7/8/10
The following are the recommended requirements for Windows 7/8/10. Vista users will surely want to dump Vista for Windows 7/8/10 and XP users will eventually lose support for XP, so purchase computers now that has sufficient resources to run Windows 7/8/10:
- Windows 7/8/10 Home or Professional
- Processor = 3.0+ GHz
- RAM = 4GB (32 bit) or 4-8GB (64 bit)
- Disc Space = 16 GB 32 bit/20 GB 64 bit
Hardware - Computer Components (Hard Drive, Processor, Memory)
Simply put, your computer should be built for business purposes. Many computers (desktops and laptops) sold 'off the shelf' are intended for light home use - email, word processing, web surfing...
All too often businesses use computers that have been connected to the Internet (which are likely infected with 'malware' - viruses, spyware, trojans...). Invariably inadequate computer resources and poor or nonexistent computer maintenance are responsible for computer crashes and error messages, lock ups and slow processing.
Only software necessary for business use should be installed on the computer. Each additional installation of a software program increases the chances for incompatibilities and conflicts.
Get a Dell (888-782-3355) i5 or i7 Inspiron - $15/month lease (48 months) or about $500 (no monitor).
Reasons to Choose Dell:
- 30-Day Getting-Started Assistance for installation optimization, configuration and limited usage questions
- 24/7 Comprehensive On-Line Support
- Telephone Technical Support
- 1 Year Next-Business-Day On-Site Service
- 1-Year Basic Limited Warranty and13-Year Next-Business-Day On-Site Service
- Free Shipping, Including Peripherals (Like Printers) on orders over $600
- Next-Business-Day On-Site Service
- 1 Year Hard Drive Data Recovery
- Financing - There's no reason not to have a brand new trouble-free computer under warranty - $16/month lease, no payment for 90 days. (Offers vary.)
Please note that Dell's special offers change frequently.
BCSS is not compensated by Dell for recommending them. We do so because they are reputable, the products are reliable and their service is excellent. Installing BCSS on a new machine with adequate resources saves us literally hundreds of hours of support every year.
Duplicate ID Warning
All databases sort numbers in order when the column only contains numbers. If the ID column has a mix of numbers and letters all databases sort the column as text, so 1,2,3,10 will appear as 1,10,2,3.
The program will keep track of the last number used and offer the next number in sequence when opening a new client record, new sale and so on. If an ID containing letters is subsequently used, the program will resort the column, lose track of the last-used number and issue a warning of "duplicate ID".
The solution: Close the new record. Sort the ID column. See which number was last used. Open the new record again. Edit the ID and use the next number. Complete the record entries.
Common Causes of Computer Problems
Please don't expect to resolve issues if the computer has not been properly prepared for commercial use. Almost all computers sold locally are intended for home use. They may have slower processors, insufficient RAM memory, inferior components... By all means avoid refurbished hardware.
Do not use single or double quotations marks in any data-entry fields in the program. Do not use the Enter key to make entries. If changes are made on the new-sale screen, click the Refresh Button to recalculate values.Speed Up BCSS
From Microsoft: "The most common causes of corruption are bad sectors on storage media, lost clusters, cross linked files, malfunctioning anti-virus software, viruses, and system crashes. Although 99 percent of a file may be intact, a few missing or corrupted structures are enough to stop an application cold, leaving the user frantic and the IT professional in a jam."
- If the computer is running slowly or 'crashing', in all probability it doesn't have enough resources (RAM memory, hard disk/front-side bus/clock speed and/or the resources are being consumed by other programs. (There are other causes like viruses, spyware, damaged components...) Right click on the Taskbar and start Task Manager. Click on Processes. Click on the header for memory to sort programs by the amount of memory each is using and observe which are using the most. Next, click on start and type msconfig then click on Startup. These are all of the programs running in the background, using up resources. Most of them can be disabled. Consult with an IT tech or someone knowledgeable before stopping any of them. It's important to understand how a computer works before concluding that any software program is responsible for a computer 'crashing'.
-
To speed things up, in Program Setup on the General tab, check 'Zero Quantity in Inventory Work Area List?' to only include unsold items in inventory in lists.
- In the BCSS Inventory Work Area, select Batch Delete and delete old records.
- Select Inventory then Storage and use the option to send items to Storage. (This will not reduce the size of the database but it will remove items from appearing in lists.)
- Consider paying tech support to permanently delete records prior to a date you provide. (The current database could be kept and reloaded if historical information is needed. Shrinking the database in this way will speed up processing.)
- Use the time filters to reduce the number of entries listed in the tables. Looking for a transaction from today? Click on 'Today':
- For remote computers on a network, in Program Setup, on the Inventory tab, turn Automatic Discounts off. On the General tab, set the auto backup time to 25:00 to prevent backups on remote stations.
- Increase the computer's RAM memory. You might want 4 gigs for Windows 7/8/10 (for 32-bit). For 64-bit, much greater amounts of RAM are allowed and preferable.
- Perform a Disk Cleanup. (Go to Start and type disk. Select Disk Cleanup.) This removes unnecessary files (like temporary files) from the computer.
- Defrag the hard drive. (Start > Programs > Accessories > System Tools > Disk Defragmenter, or search Windows Help for defragment)
Your Computer
Almost invariably difficulties are caused by using:
- Laptops - which spin the hard drive about 25% slower than a desktop (to keep them from over heating). They can be suitable for business use if they have adequate resources (RAM memory, free hard-drive space, clock speed, front-side bus speed) and are in good working order (relatively new, free of malware/viruses and unneeded programs).
- Computers processors like Atom, Celeron, Centrino, Pentium - often found in laptops and 'off-the-shelf' computers. (See where your processor ranks, and test its speed.)
- Business computers connected to the Internet, particularly without adequate virus and malware protection - (Avast, AVG, Kaspersky, Norton and free anti-virus programs are not adequate. Microsoft Security Essentials is good free protection and is included in Windows 8/10.)
- Computers infected with viruses, malware, spyware, adware
- Computers with inadequate resources (free disk space, RAM memory, clock speed)
- Computers with corrupted Windows registries (causes error 1429)
- Windows Vista/7/8/10 - For BCSS (and most software) to run properly, the user must be logged into the computer as Administrator to install and run software, or users must be granted permission.
- Improper computer use, including no surge protector/power backup, leaving the computer plugged in overnight, shutting the computer off with the power button (vs. Start > Shutdown), stopping BCSS while it's performing a function...
- Other software programs. (Go to Control Panel, Programs (or Add/Remove Programs) and remove unused software. Be careful.)
- Other software programs. If BCSS was working and stops working, were other programs installed? Quite often the culprit is an update to another program (like an anti-virus program or Windows itself). When BCSS 'stops working' do a system restore. (See Windows help.)
- Too many printer drivers. (Go to Control Panel, Printers and delete all unnecessary entries.)
- Windows. It's a software program. Like any other it can and does become corrupted and needs to be reinstalled.
- Windows Vista 7/8/10 User Accounts: If settings are not saving on the computer, go to the Control Panel then User Accounts then 'Change User Account Control settings' and turn UAC off. Also, right click on the BCSS-Run Desktop icon. Select Properties and click on Advanced. Check 'Run as Administrator' and save the change. Click on the Compatibility tab and set all users to run the program as administrator.
- Computers at work should be dedicated to work functions. They certainly should not be used to download from the Internet, particularly from BitTorrent sites. If the computer is loaded with unnecessary software, runs too slow, crashes often - reformat the hard drive, reinstall Windows (preferably Win7/8/10) and give your computer a fresh start.
When a computer with one or more of the above afflictions is used in a commercial environment, it is the computer that becomes confused, overwhelmed and exhausted. It is the computer, not the software program, that 'locks up' and 'crashes'. There's nothing wrong with the software. This has been proven by thousands of businesses using BCSS on commercial-grade, well-maintained computers.
System Requirements
- RAM Memory: XP: 512KB (1 gig preferred); Vista/Windows 7/8/10 (32-bit): 2-4 gigs; 64-bit maximums (not required for BCSS): Starter: 8GB, Home Basic: 8GB, Home Premium: 16GB, Professional: 192GB, Enterprise: 192GB, Ultimate: 192GB
- Clock Speed: 3GHz
- Processor: Pentium or AMD (Advanced Micro Devices) - never Celeron or Centrino
- Operating System: Windows XP or Vista with latest Service Packs
- Commercial grade surge protector
Poor Maintenance
'Disk Defragmentation' and 'Registry Repair' are necessary to keep hard drives and registries clean.
Windows Security Updates must be performed frequently. Windows should be set to Updated Automatically once per day at a time when the computer is on. By default, automatic updates are set for 3 a.m. when most computers are off. (See Windows Help.)
Troubleshooting BCSS
Please don't expect to resolve issues if the computer has not been properly prepared for commercial use.
Difficulties sometimes arise when program files become corrupted. Corruptions can be caused by power surges or spikes, inappropriate closing of BCSS, hard computer shutdowns, poor downloads, low computer resources, electrical surges, lightning and so on. See Wikipedia's explanation of data corruption.
Fixing the Problem
The new FoxPro version of BCSS includes 2 options under Utilities to make it easy to resolve 'lock ups' and some minor glitches: Rebuild Database Indices and Reset Program. Please use these options to fix minor issues.
The next option is to exit BCSS and turn the computer completely off (not reboot) and retry the function that caused the problem. If the problem persists, restore the last data backup. (If data is backed up daily, data loss will be minimal.) If this resolves the issue, it means that the current database is corrupted and should not be used. If the program will open using the current database, any recent entries could be viewed, recorded and reentered using the backup database.
If using a previous database doesn't resolve the issue, update the BCSS program to the most recent version:
- Click on the link corresponding to your BCSS edition to obtain the latest version of BCSS. (Close BCSS and save the bcss.exe file in (C:\BCSS):
Restart BCSS. If the error still exists, try the last backup again.
BCSS was working. Now it doesn't.
If BCSS was working and now there's a problem, the cause could be any number of things. Unfortunately we can't be there at the time of the occurrence so we have to ask questions to find out what caused the problem. Was another program installed or updated in the interim? Was Windows updated? Are employees shutting the computer off with the power button or interrupting BCSS while it is processing? Electrical surge? (Is there a surge protector between the power supply and the computer?) Email us for free support (or contact Realize Technologies, ) when there's a problem. So far we've been able to fix most issues (in 14+ years).
Error 1806 indicates that the BCSS database has been changed and your files need to be adjusted. Please email support to arrange to have your updated.
Error 1924 (Sale Form is not an object Line of code with error: Line number of error: 4409 Program with error: APP_TOPFORM.TOOLBAR.ERROR) - sometimes appears when attempting to enter a second sale. This is an indication of a corrupted program file. Please email support to arrange to have your program updated.
"The resource file is not valid. Overwrite it with a new one yes or no? - It is safe to answer "Yes". The message should go away and no damage will be done to data files.
Email Function Doesn't Work. - Recent Windows Updates have broken the link in the email component used in BCSS. We are waiting for the author of the print preview component to fix it.
Printing Account History limited to 1 page - This was corrected in the 4/26/09 update, version 5.1.2486. Please contact support to update BCSS.
Uninstall BCSS
Back up your data! before uninstalling
How to Uninstall BCSS
- Back up data!
- Note the edition of BCSS (Intro, Deluxe, Diamond, Virtual).
- Type 'computer' in the search box next to the Start Button.
- Select 'My Computer' or 'This PC'.
- Click on the C: Drive.
- RIGHT click on the BCSS Folder.
- Select Copy.
- RIGHT click anywhere to the right in the white area.
- Select Paste. Any files that were stored in the BCSS are not copied in a folder named 'BCSS Copy'.
- Go to the Control Panel. (Type 'control panel' in the box to the right of the Start Button.)
- Click on Programs and Features.
- Click on the BCSS listing.
- Click 'Yes' to confirm that the program is to be removed. MAKE SURE YOU HAVE A RECENT BACKUP OF YOUR DATA!
- After Windows confirms that the program has been removed, close the Control Panel.
- Go back to C: drive and delete the folder named BCSS.
Reinstall BCSS
Restore Data
See Data Restore.Update BCSS
Press the control key and D at the same time to bookmark this page.
![]() Pass the cost of credit-card processing on to your consignors by deducting a small % from settlements of credit-card sales, and/or add a small % to credit-card sales at POS. Any consignor or purchaser objecting can be excluded.
Pass the cost of credit-card processing on to your consignors by deducting a small % from settlements of credit-card sales, and/or add a small % to credit-card sales at POS. Any consignor or purchaser objecting can be excluded.
![]() Your consignors (and vendors) can now view their account information online, on their computers and mobile devices.
Your consignors (and vendors) can now view their account information online, on their computers and mobile devices.
Both of these features can be used to increase store profits. Call 888-427-5779 or email.
Software Updates Are Free
'Software updates' are software advancements that keep BCSS current with 1) changes in technology - mostly changes in Windows and 2) minor improvements in software features.
Updates are done in the background at no additional cost to BCSS clients, ergo 'free'.
Updates do not include support of your shop - answering phone calls and emails, conducting remote-pc sessions and explaining 'how to'.
Update Your Program Using Chrome: (Scroll down for Internet Explorer.)
- Backup your data.
- Click on your BCSS Edition: Intro, Deluxe, Diamond, Virtual.
- Depending upon the version of Chrome, it will either open a 'Save As' screen or place a download icon in the lower-left corner of the screen. Can't see it? Maximize the screen.
- If a 'Save As' screen opens:
- Go to 'This PC' or 'Computer' then C:
- Select the BCSS folder.
- Click 'Save' and choose 'Yes' to replace the existing bcss.exe file.
- The 'BCSS app file' has been updated.
- Open the program and check for the issue.
- If Chrome places a rectangular box in the lower-left corner, the BCSS app file (bcss.exe) will be placed in the Downloads folder. To find the Downloads folder, type 'downloads' in the box to the right of the Start Button.
- Open the Downloads folder.
- Right click on the bcss.exe file (which will be named 'bcss' if Windows is not showing file extensions on your computer).

- Select 'Cut'.
- Go to the BCSS folder on C:
- Right click on the BCSS folder.
- Select Paste and choose 'Yes' to replace the existing bcss.exe file.
- Open the program and check for the issue.
If a problem persists, in all probability it is not being caused by the software and assistance is needed.
Update Your Program Using Internet Explorer or Edge:
- Backup your data.
- Click on your BCSS Edition: Intro, Deluxe, Diamond, Virtual.
- Click on the down arrow and choose 'Save as':
- Go to 'This PC' or 'Computer' then C:
- Select the BCSS folder.
- Click 'Save' and choose 'Yes' to replace the existing bcss.exe file.
- The 'BCSS app file' has been updated.
- Open the program and check for the issue.
If a problem persists, in all probability it is not being caused by the software and assistance is needed.
Need Help?
We're crossing the 'proverbial red line' - going from 'free software updates' to 'I need help with my computer.'
Service Agreement Refresher
- You purchased BCSS at a cost far below competing programs because the price wasn't padded with prepayment for support.
- Your store is enjoying the cost savings of 'no annual support fees'.
- Remember? Our 'agreement' is that payment for support is made when support is provided.
- Customer support communication with the shop and hand-on assistance.
- Tech support is back-end work related to the software and the database.
- Billing is separate for customer and tech support.
- With a couple of basic computer skills, shop owners/employees can perform updates without having to pay either.
Of course local computer techs aren't going to know anything about the software. They 'should' be able to follow the instructions above but most of the time, they end up calling us for help regardless and when that happens shops get billed twice.
Customer support and tech support are the best (and least costly) options for assisting with issues beyond the free aspect of updating.
Update Announcements
Perhaps as often as once every six months, view the latest updates at https://www.bestconsignmentshopsoftware.com/update.htm to see if any new features are of interest.
Recent Changes
- The Send-Data Button has been replaced by automatic daily updates.
- 'Batch Enter' in the Consignor Menu was changed to Batch Consignment.
- A search box has been placed at the bottom of each work-area list. Search by key press> by clicking 'Search Name' (or other search options in other work areas) and start typing the first part of a name, ID, description or number to locate a record.
- Click in the search box in the Inventory Area and scan a barcode to find an item.
- Data backups now occur automatically at the time set in Program Setup > General.
Update Records with Import
Consignor and inventory information may be imported into Deluxe, Diamond and Virtual databases from spreadsheets. (Buyer information may be imported into Diamond and Virtual databases. Deluxe does not have Buyer Records.)
Please note: MSWorks and Open Office do not export data in correct format. Please use Excel or use free Google Docs online or free Libre Office (which is very similar to Microsoft Office).
Why Import?
Save time: Hours of data-entry time may be saved if data for consignors and/or inventory and/or buyers already exists in spreadsheet format.
If data does not exist in a spreadsheet, entering data in a spreadsheet (for many items) and importing that information into BCSS may save time by using Excel's drag-and-fill function.
Also, data may be entered by multiple people using different computers and spreadsheets. Data from each spreadsheet can be imported into one BCSS database. Selective price labels may be printed by making settings on the Labels Screen.
Existing records can be edited in batch by making changes on the spreadsheet, entering the Internal ID (not the Client ID) and importing again.
The Spreadsheet Source Files
The 'Source Files' consignors.csv and inventory.csv (and buyers.csv for BCSS Diamond and Virtual) are used for entering information about consignors, inventory (and buyers).
Download the most recent versions from import.zip.
Entering Data in the Source Files
The first row in the spreadsheet contains 'headers'. It is imperative that no changes be made to the order of the columns.
The second row in the spreadsheet will be the first record in BCSS for a new Consignor, Inventory Item or Buyer.
Here are some data-entry rules that must be followed:
- REMOVE ALL LINES OF INSTRUCTION (row 2 and all rows below row 2) before importing.
- For the Name Field (column B), enter the last name first, space, first name. It makes for a cleaner data display to capitalize the first letter of both names.
- In all data entry, don't press the Enter key in any cell. 'Enter' is interpreted in all databases as a line break and we don't want those. Also avoid using punctuation, especially hyphens. Periods are ok in prices and must be used when entering percentages.
- NEVER use commas or quotes. Use Excel's Find and Replace feature to find commas and quotation marks and replace them with 'nothing' (by leaving the 'Replace with' field blank).
- Use the date format selected in Program Setup. The default is mm/dd/yyyy. (example: 10/31/2010)
- Use this phone format: 555-555-5555
- Percentages are entered in decimal format: Enter 45% as .45, NOT 45% or 45. Enter 1 for 100%.
- Enter 'T' (without quotes) for those who are to be marked as Active and who are to receive Mailings, Reports or Online Access (BCSS Virtual only), or leave blank. T = True; F = False
- For Disposition (of unsold inventory), enter 1 for Destroy, 2 for Donate, 3 for Return, 4 for Transfer to House. If this field is left blank, the default setting is Return.
- Any cell may be left blank. BCSS will use defaults (in Program Setup) if a cell is blank. (examples: Consignor % is 40% and status is 'Active' by default.)
- For Buy Outright enter the Buy and Sell Prices.
- If BCSS cannot find a correct Consignor ID upon import, it will assign a generic Item # like '5863'. Make sure the Consignor ID is in Column B on the import sheet.
- After import, if barcodes are being used, click on Inventory then on Assign Barcodes. A message should appearing noting how many barcodes have been assigned.
Client IDs and Internal Client IDs
The Client ID is the ID for the Client Record. Assign it when creating a New Client Record. It is used in the store to identify consignors. Punctuation should not be used.
If numbers are used for Client IDs, the program will suggest the next-available number for the record being created but the suggestion can be changed. The Client ID can be assigned by the person creating the New-Client Record.
After the client record has been created, the Client ID can be changed but should not be changed if there has been activity in the client's account (to avoid losing connections (links) between the client, the item(s) and the transactions).
In addition to an ID for each client, buyer and inventory record, BCSS assigns a unique 'Internal ID' to each client record, and uses that ID internally for identification and tracking. (Internal IDs cannot be edited.)
Each data import sheet (consignors.csv, buyers.csv and inventory.csv) have both IDs. Clarity between Client ID and Internal Client ID is necessary to avoid confusion:
- Client, inventory and buyer records display Internal IDs. They may also be viewed by exporting records using the (CSV) export functions under Utilities.
- For each new item the Client ID (not the Internal ID) must be entered in column B on the inventory.csv spreadsheet to let BCSS know to whom the item belongs.
- The Internal ID must NOT be entered in the import spreadsheet when importing a NEW client, buyer or inventory record.
- The Internal ID MUST be entered in column R to UPDATE an existing client, buyer or inventory record.
- Duplicate records will be created if the same (client, buyer, inventory) data is imported without the Internal ID.
Create Client Records Before Entering Inventory:
- Create a Client Record for every client for whom inventory will be imported. (Create records by importing client information from a spreadsheet (see how below) and/or by adding Client Records using the New-Client Screen.)
- Export Client Records using 'Export Clients' under Utilities in BCSS:
- Save the file to the Desktop and set it aside for reference (for Client Internal IDs) when adding items to the inventory spreadsheet.
Preparing the Source Files for Import
- Download the most recent import sheets from import.zip.
- Use your computer's unzip program to extract the files from the zip folder.
- Open your computer's spreadsheet program (Microsoft Excel or something similar - Free spreadsheet programs are available from openoffice.org and Google Docs. Please DO NOT use MSWorks.)
- Click on File, Open and navigate to the folder containing the unzipped files.
- Select consignors.csv, inventory.csv or buyers.csv and click Open (or something similar).
- Save the file to the Desktop (where it can be easily located later). This will leave the original .csv files in the zip folder for future reference.
- In (consignors.csv, inventory.csv or buyers.csv) read the instructions and guidelines in Column A and delete all rows that contain instructions.
- Column A, Item Number: Leave blank. BCSS will auto-enter the Item Number based upon the Consignor ID entered in column B. Enter the Internal ID of a current item (column R) to amend its record.
- Column B, Consignor ID: In BCSS create a record for each consignor. The Consignor ID is displayed in each Consignor Record. On lines 9 and 10 the sample Consignors IDs are 17 and SmithJ.
- Column C, In Date: Usually the date the item was brought to the store
- Column D: Quantity: The number of items that will use the same Item Number
- Column E: Description: Up to 20 characters - Appears on price labels
- Column F, Details: Up to 100 characters - appears on medium price labels and in reports
- Column G, Original Price: The original selling price
- Column H, Current Price: If left blank the Current Price will equal the Original Price
- Column I, Lowest Price: Leave blank for new items
- Column J, Consignor %: Enter in decimal form (.4 = 40% to the consignor); Leave blank if the % for the item is the default % set in BCSS.
- Column K, Discount Date: Leave blank for new items
- Column L, Discount: Leave blank for new items
- Column M, Notes: Enter any information as a reminder or as note for others in the shop to see.
- Column N, Picture: Enter a PC location (example: C:\Program Files\BCSS\Images\Morrison-recliner.jpg) or internet location (example: http://www.mywebsite/images/Morrison-recliner.jpg) of an image of the item.
- Column O, Rental: Leave blank for new items
- Column P, Bar Code: This may be left blank. Assign bar codes in BCSS after importing.
- Column Q, Buy Outright: Enter the buy price of a resale item
- Column R, Internal ID is a system ID created by BCSS for its own use. It can be viewed in a Consignor Record or in a Consignor Data Export. Do not make an entry in this column for new items. Do make an entry in this column to update information for an existing item.
- Column S, Category ID: Enter the ID # of the Category.
- Columns T through AO are for User-Defined Groups
- Column AN - Owner-Applied Number: Any sequence of letters and numbers desired to further identify the item
- Column AO, Buy Price: Enter the price paid for a buy-outright item. Does not apply to consignments or rentals.
- MAKE A BACKUP OF THE CURRENT BCSS DATA BEFORE IMPORTING so data can be restored if there's an error in the import.
- When preparing and importing a Source File for the first time, test the process by importing only 2-3 entries. If errors are encountered, restore the last data backup to remove the errors.
For reference, these are the notes in column A in inventory.csv:
![]() It is NOT necessary to enter the Item ID in the inventory spreadsheet. It IS necessary to enter the Client Internal ID in column B. From that BCSS will determine the correct Item ID (Client ID and next Item Number) and will auto-enter the Item ID in the Item Record.
It is NOT necessary to enter the Item ID in the inventory spreadsheet. It IS necessary to enter the Client Internal ID in column B. From that BCSS will determine the correct Item ID (Client ID and next Item Number) and will auto-enter the Item ID in the Item Record.
To change information about an item in the database, enter the Internal ID in column R.
Importing Data into BCSS from the Source File
Before importing into BCSS make a backup of the current BCSS data. If the import produces undesirable results, just restore the data backup.
- After the import sheet has been prepared, in BCSS, under Utilities, select Import Clients or Import Inventory or Import Buyers.
- Navigate to consignors.csv, inventory.csv or buyers.csv (or whatever filename you assigned). Select the appropriate one. (A message will appear warning of duplicate records, if any. Abort the import, correct the duplication(s) and attempt to import again.)
- Records will be added to the BCSS database, or records will be updated if Internal IDs were included in the import. View the new records for accuracy.
Reminder: BCSS Deluxe does not have Buyer Records.
Note: For batch inventory entry, after data has been imported, it may be necessary to determine the next ID number and enter it for the first new item being entered.
Helpful Hint: Once a Client Record has been created in BCSS, it cannot be deleted. It may be edited and used for another Client but only if there has been no activity in the account.
Save the current database before importing. If errors are made during import, just restore the saved database.
When importing records for the first time, import just 1 or 2 records. View the records in BCSS for accuracy before importing more records. Finding mistakes at the very beginning will save time later on.
With Diamond or Virtual, incorrect Buyer Records can be deleted so when importing records for the first time, it might be better to experiment with importing Buyer Records (rather than Client Records which cannot be deleted).
Update BCSS Records Using a Spreadsheet
Client, inventory and buyer information in BCSS may be updated by importing the same record with the Internal ID entered in the Internal-ID column.
- If necessary, export Client or buyer records to obtain Internal IDs.
- Save the exported data under another filename, like 'inventory-edit.csv'.
- Delete all of the items on the spreadsheet which aren't to be amended.
- Make changes to the records to be amended.
- In BCSS, under Utilities, select Import Clients or Import Inventory or Import Buyers.
- Check the records of the items amended for accuracy.
If there are many records in the exported file, rather than delete hundreds or thousands of entries, create a new spreadsheet with the same first row (headers) and copy/paste the rows (that are to be amended) from the exported file to the new file, then import only those records.
What Is a .CSV File?
Data is entered in a spreadsheet in table format. Cell E2 (column E, row 2) contains the value 'Milton' in this example:
Each row in the table is a record. In the above example, row 2 is the record for Ben Adams.
Each column in the table (A, B, C etc.) is a 'field' and contains information related to the record. In this example, Column A is the 'Client ID field'; Column B is the 'Name field' and so on.
A data file can be saved in 'comma-separated-value form' with a .csv extension. When a .csv file is opened in a text editor (like Notepad) the data appears on one line and the data (fields) are separated by commas - hence the name, 'comma separated'. Each time the database 'sees' a comma, it knows to move on to the next field.
When a .csv file is opened in a spreadsheet, the data appears as it is displayed in rows and columns:
The CSV files contain the following information:
- The Buyer List (buyers.csv - Diamond and Virtual only) contains columns (fields) named Buyer ID, Name, Street1, Street2, City, State, Zip, Phone1, Phone2, Email, DOB, Mailings?, User Text, Notes, Credit Limit, Credit Rating, Tax Exempt ID, Discount, Education, Employer, Income, Interests, Auto
- The Check List (disburse.csv) contains columns (fields) named Payment ID, Name, Address 1, Address 2, City, State, Zip, Country, Phone, Email, Check Number, Date, Amount, Memo, Bill, Cash Withdrawal, Commission ID
- The Clients and Vendors List (consignors.csv) contains columns (fields) named Client ID, Name, Street1, Street2, City, State, Zip, Phone1, Phone2, Email, DOB, Mailings?, Reports?, Client %, Disposal, User Date, User Text, Notes, On Line?, Password, Balance Credit, Client Internal ID, Store Credit, Last Sale, Last Settlement, Beginning Balance, Active?
- The Inventory List (items.csv) file contains columns named ItemNum, Internal Client ID, In Date, Quantity, Description, Details, Original Price, Current Price, Lowest Price, Client Share, Disc Date, Discount, Notes, Picture, Rental?, Barcode, Buy Outright?, Internal ID, Category ID
- The Sales List (sales.csv) contains columns (fields) named Invoice ID, Name, Address 1, Address 2, City, State, Zip, Salesperson, Terms, Payment Method, Discount, Tax Percent, Paid, Date, Quantity, Price, Description, Item ID, Void, Email
Windows
Windows 'User Account Controls' is intended to provide additional security on computers which are used by more than one person. Only the 'Administrator' can make global changes on the computer (like installing software). The intrusion and inconvenience can be very annoying. (Click Start, Help, search for 'Administrator' to learn more.)
If you are the only person using the computer, or trust others who are using it, there is nothing to protect against. If you have employees, BCSS Diamond or Virtual will provide the means to block them from accessing confidential information in BCSS.
For Vista: Control Panel > User Accounts > 'Turn User Account Control on or off'. Uncheck 'User Account Control (UAC) to help protect your computer' and click 'OK'.
For Win 7/8/10 - Control Panel - User Accounts - 'Change User Account Control settings'. Pull the slider down to 'Never notify' and click 'OK'.
Open BCSS and try saving entries again. The problem should be resolved.
If BCSS is on a network and the issue has not been resolved, See 'Access Denied).
Getting Help with Windows and Computers
You've encountered an error while using BCSS. The 3 likely causes (which are not part of the BCSS program) are Microsoft Windows, your computer and/or corrupted data files.
By following the steps below, you will be able to determine the cause of the problem and whom to contact for help.
A common cause of computer problems is poor (or no) virus and Internet security protection. If you are using any anti-virus other than ESET (including Norton, PC-cillin and Kaspersky) there's a pretty good chance your computer has been compromised. If you are using free anti-virus software you most assuredly have computer infestations.
Another cause of problems is anti-virus software. It may be necessary to add 'bcss.exe' to allowed programs in your anti-virus program. (See the program's help section for guidance.)
Where to Get Help
POS-X Equipment (including setup/installation): Press F1 while viewing BCSS and scroll down on the left in the manual to Printers then click on POS-X Printers, or call POS-X at 800-790-8657 .
Epson Printers (including setup/installation): Press F1 while viewing BCSS and scroll down on the left in the manual to Printers then click on Epson Receipt, or call Epson at 562-276-1314 .
Other Hardware: Contact the provider or maker of the equipment.
Windows and the FoxPro Database:
- Click on the Start Button, then Help and Support and enter a keyword to search for help in Windows Help. (Be sure Windows Updates are current.)
- Retain local IT services. (Search Google for 'computer repair city' (replacing 'city' with your city's name).
BCSS Support:
We are last on the list for a reason: When our software can't function as it should, the causes are usually virus infections or computer or Windows-related issues, all of which are not supported by us, but these services can help determine the cause and find solutions:
Do It Yourself: Determine the Cause / Find a Solution
- In BCSS, click on Utilities then Rebuild Database Indices. If that doesn't clear the issue, proceed to the next step.
- Restore data. Back up your data then restore a set of data files dated just prior to the date of the problem appearing. If the problem goes away, then your current data files are corrupted and need to be repaired.
- Restore Windows to a previous date. (Click on the Start Button and Select 'Help and Support' then click on System Restore for instructions.) If this resolves the problem Windows Restore will display the change(s) that were made after the 'restore point' that may have caused interference with BCSS. (Windows Restore is completely reversible and there's no risk of losing any work or data.)
- Troubleshoot the computer.
Troubleshoot Your Computer
- Check your PC's resources. Right click on Computer (often found by clicking on the Start Button) or on My Computer (often on the Desktop) and select Properties. Here's a sample of a portion of the Properties Screen:
- RAM memory (purple arrow) should be 1 gig for XP, 2-3 gigs for Vista/Win 7/8/10. Large databases with 1,000's of records will require more.
- Clock rate (clock speed) (black arrow) is how fast a computer completes computations and operations. Yours should be 2GHz or higher.
- Your hard disk drive revolutions (green arrow) should be 7200 RPMs or better (for a PC). Laptops spin at around 5200 RPMs (to avoid overheating) which is why they are inherently about 30% slower than PCs.
- If your processor is Celeron or Centrino, Pentium 3 or lower, expect (much) slower processing speeds. The processor in the example is Inter(R) Core(TM)2 Duo CPU. The most recent Intel processors are i3, i5, i7 Core.
A local PC shop can easily diagnose your computer and make recommendations for generating more speed and efficiency. Computers that are always crashing and interfering with normal operations probably need to have Windows reinstalled to refresh the installation and update Windows to Windows 7/8/10 Professional.
After download close the browser window of instructions. The Smart PC Scan Screen should be present and ready. Select Deep Scan and click the blue Start Smart PC Care button.
ASO will check for junk files and folders, disk drive fragments, spyware and malware, privacy traces, outdated/missing drivers, Windows Registry errors and fragments. At the end of the scan, you'll see a report of its findings. Click the orange Register Now button to purchase the program and repair the errors.
- Run Scandisk periodically to repair bad hard-disk sectors. Go to Start then Run and type chkdsk /f. (There is a space before the forward slash.) Click OK. Windows will scan the hard drive for errors, repair them and present a report of its findings. (See Windows Help.)
Repair Damaged Data Files
Your data is stored in the FoxPro database on your hard drive (at C:\BCSS). There are a number of causes of data corruption: no electrical surge protection, hard shutdowns, power failures, program interruptions, bad disk sectors, failing components, etc. Our 'free support' doesn't include fixing something we didn't break but we can help fix it.
Here are the steps for data repair:
- Send us your data files:
- Press the Send Data button (in BCSS, upper right corner) to upload your data files to our server. If you don't see a message confirming that 69 data files have been uploaded, try again. When files have uploaded successfully, send an email to us stating your name, shop name and reason for sending the files including error messages and actions taken to produce the error.
- If there is no Send Data button, zip and send your last backup folder to sales@bestconsignmentshopsoftware.com along with your name, shop name and reason for sending the files including error messages and actions taken to produce the error.
- If you are unable to open BCSS, send your data files by zipping the entire BCSS Folder (C:\BCSS or C:\Program Files(x86) or C:\Program Files\BCSS) and emailing it to sales@bestconsignmentshopsoftware.com along with your name, shop name and reason for sending the files including error messages and actions taken to produce the error.
- For files over 2MB, use WeTransfer.com to send data files and information to sales@bestconsignmentshopsoftware.com.
- Go to https://www.bestconsignmentshopsoftware.com/remit.htm. Enter 29 in the field named 'Enter an Amount' and press the Blue Order Button to remit $29 using a credit card. Send an email to support if you prefer another payment method.
- We will return the files to you (usually within 24 hours) with instructions for updating BCSS and installing your repaired files. If you need assistance please contact sales@bestconsignmentshopsoftware.com.
Reduce the possibility of data damage by following these practices:
- Don't use old equipment. These days you can lease a brand new powerful Desktop PC from Dell for $15/month.
- Use a surge protector/power backup between the PC and the power source.
- Don't use the power button to shut the PC off. With XP, go to Start > Turn Off Computer. For Win7/8/10 use the Log Off function under the Start Button.
- Make sure there are no malware/spyware/virus/worm/trojan infections and use a commercial-grade anti-virus program, ESET.
- Don't use the computer to download bit torrent, games, music, movies, software programs (especially 'free' ones and ones from untrusted providers).
- Don't interrupt BCSS while it is processing information.
- Don't jar the computer.
- Don't place the PC on the floor (where it can collect dust).
- Close all other programs before installing BCSS.
- Reinstall Windows after reformatting the hard drive. That's the best way to eliminate problems without having to spend hours fighting with a machine and trying to discover what the causes of problems are. After Windows reinstallation only install programs that are necessary.
- Train employees on how to use a computer and Windows. (Teaching Windows doesn't become the responsibility of a software developer whose software you've installed. There is lots of free help on the Internet for learning computing.)
- Don't let people who don't know what they are doing operate your computer.