Consignors & Sellers - "Clients"
BCSS can be used to sell consignments and to buy merchandise from individuals for resale. Consignors and sellers are referred to collectively as 'clients' in the program.
Missing RecordsIf your data files are sent to tech support for an update or repair, don't add or change data in the program.
Inactive Records won't be included in lists and reports if individual records as tagged as 'inactive' and 'Include Inactives in Lists' in Program Setup (Clients tab) is not checked.
If a Record is 'missing':
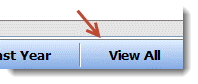
- Click 'View All' to make sure all records are present:
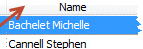
- Sort the name column by clicking on the column header:
- Scroll to find the record. If it is not present...
- Client records can be searched by either Name or ID but not both. (To select one or the other, go to File > User Interface. Change the designation; click Save/Exit; close/reopen the program.)
- In the Clients Work Area, if the search box contains 'Search Name'...
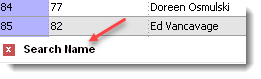
...start typing the name. - If the search box contains 'Search ID'...

...start typing the ID. - If the name or ID doesn't appear check the name or ID entered for correctness and search again.
Still no record? The next likely possibility is that the client record is flagged as 'inactive' and inactive records are not included in the client list. To make inactive records appear in the list:
- Go to File then Program Setup.
- Switch to the Clients page.
- Check 'Include Inactives in Work Area List'.
- Press Save/Exit.
- Press View All.
- Sort the name or ID column and look again, or
- Search for the name or ID in the search box.
- Edit the record and check as active:

- If other inactive records are not to be displayed, return to Program Setup and remove the check mark to include inactive records.
In older versions of the software the database sorted all lower-case names first then first-letter-cap names next. Scroll through the entire list to see all possible variations of the name.
Import Client Data - Client information may be entered in spreadsheets (in .csv format) and imported into BCSS. This spreadsheet must be used: https://www.resell4.me/import/clients.csv. Use these instructions.
Existing client records can be edited by exporting client records (under Utilities), making changes, then importing back into BCSS - a quicker way to modify multiple records.
Change Client % Globally using the Percentage Tool. Options include changing the % for all clients, changing only unsold items or changing sold/unsettled items.
Hide Old Client Records
- In Program Setup (Clients tab) uncheck 'Include Inactives in Lists'.
- To mark one client account as Inactive, edit the client record and remove the check from 'This Client Is Active' and save the change. To show the record in lists again, check 'This Client Is Active' and save the change.
- To mark multiple accounts as inactive, in the Client Work Area, select Batch Deactivate. Set a date and click OK. All records with no activity prior to the given date will be deactivated.
Inactive accounts will not appear in drop-down menus and lists.
Inactive accounts may be excluded from Reports by checking 'Active Only' on the Client Report Screen.
Inactive accounts are not removed from the database so deactivating accounts will not reduce the size of the database.
 Do not use any characters (other than a dash) in Client IDs.
The Client ID
Before creating the first client record, for Client IDs, decide whether to use numbers, letters or a combination of letters and numbers for IDs. If numbers only are used, the program will suggest the next number in sequence when adding a new client record. If letters or a combination of letters/numbers are used, the program will not know an ID to suggest for a new client record.
- The Client ID appears on price labels and in reports. Numbers don't indicate identity where using part of the last name and first initial (or initials) for Client ID suggests client identity.
The Client ID CAN be changed later on and here's why:
The program creates its own 'Internal ID' for each record, so it knows each client, not by the Client ID (assigned by the store) but by the Internal ID (assigned by the program).
Allowing the Client ID to be changed provides the flexibility sometimes needed to resolve issues:
- The store owner decides that using part of the last name and first initial is a better system for Client IDs and wants to change them.
- The store is sold and the new owner prefers a different ID format.
If numbers only are to be used, open the new-client screen and observe the Internal ID:

Use the number that appears on your screen (not in the image above, which may be different) for the Client ID.
Each time the new-client screen is opened, the next number in sequence will appear for the Client ID. (If a 'duplicate-ID message' appears, sort IDs in the Clients Work Area, determine the last-used number and use the next number for the new client.)
If you're thinking that changing the Client ID would really mess things up, you're right. If we had originally created a record for Mary Smith with Client ID 22, her first items would have Item IDs of 22-1, 22-2, etc.
Then when we changed her Client ID to SmithM, her recent items would have Item IDs of SmithM-33, SmithM-34, etc.
Any ordinary consignment software program would throw a 'don't know' when calling for item 22-1.
To avoid the potential confusion and colossal mess, when Mary's record was first created with ID 22, BCSS assigned an 'Internal ID' (hypothetically '34') to Mary, so no matter what you decide to call Mary, BCSS would always know her as '34'.
At POS you could call items 22-1 and SmithM-33. The program would enter both items on the new-sale invoice, credit Mary's account with the sale of both items and include the items correctly in reports (under the respective Client IDs).
- If there is a duplicate Item ID (Client ID + Item Number), delete the inventory record and reenter the item under the correct Client ID.
- Attempting to change the Client ID in batch edit will display: 'Changing the Item ID does not change the associated client'.
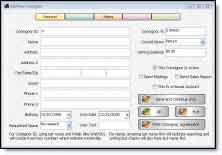
Add a New Client
To add a new client, select 'New Client' from the Client's Menu (or press F2).
Hate typing? Not so good at it? With BCSS Virtual scan your new clients' drivers licenses to auto fill the fields on the new-client screen with name, address, license #, height and weight, etc.
Part or all of the Client's last name (and initials if necessary) can be used for the Client ID (to make sorting of Client Records logical and to make ownership of inventory items easy to determine when viewing price labels and reports). Any combination of letters/numbers can be used for the Client ID. (Hyphens in the Client ID can be used but should be avoided.)
To save a record, it is only necessary to add the name of the client. Other details may be entered later by editing the record.
- For uniformity names might be entered (last first or first last - with no punctuation) to make lists neat, readable, alphabetized and sorted in correct order. If checks will be printed with the program, payee names will appear as they are entered here (last first or first last).
- Birthday can be entered by selecting a date using the drop-down calender (down arrow in that field) but typing may be quicker, especially for the year.
- Requested Space relates to Mall Floor Space Rental. (If police reporting is activated, look for that option on the Details tab.)
- User Date is seldom used. Set a date to contact this person.
- User Text can be any 'string of characters' that uniquely identifies the person (like 'best' for your best clients). (Only one 'string of characters' may be used per Client Record. Spaces are ok but commas and apostrophes will be removed by BCSS.) Later on a report can be generated using the 'user text' as a search criteria. (Show me a list of all clients flagged with the user text 'best'.)
- With BCSS Virtual check 'Allow Online Access' to grant online access to the client. See Virtual Edition.
- Remove the check from 'This Client Is Active' to not display the client record in lists and reports. This option makes it possible to 'hide' inactive records to shorten lists of clients.
- Check whether to Send Mailings and/or Send Sales Reports. These settings and many others may be used later to generate specific lists of clients for address labels, reports, etc.
- Check This Is a House Account if all sales for the client are to be credited to the shop account.
- Check No Credit-Card Fee if the client does not wish to pay for credit-card charges from settlements. (An add-on module is available for deducting a % from settlements of card sales. See credit-card processing.
The colored buttons at the top are rarely used:

- 'General' is the main page which opens when the new-client option is selected. (Throughout BCSS a yellow background on a button indicates the selected button or window or screen).
- Notes may be added for shop eyes only.
- Mail Box is for notes that are to be given to the client.
A Consignment Agreement may be printed.

Click Save/Exit to save the new record and close the screen.
If entering more than one client, press F2 or press 'Save and Continue' to save the current entry and open a new record:

Edit a Client Record
Double-click on a Client to open the Client Edit Screen. Make changes and Click OK to save changes and exit, or click Save and Continue to save changes and continue editing the same record.
An account can only have a beginning balance once. After a beginning balance has been set, use the following procedure to change account balance:
Edit a Client Account Balance
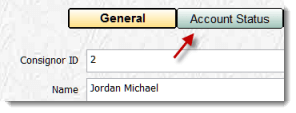
Double-click on a Client to open the Client Edit Screen.
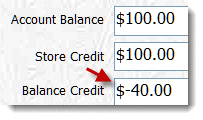
Click on the Account Status tab to view and/or edit Store Credit, Balance Credit, and last dates for Update, New Item, Sale and/or Settlement.
The first entry, Account Balance, cannot be edited (which is why it is 'grayed out').
Not allowing changes to Account Balance allows the program to keep track of adjustments made and show a total adjustment in Account History. Otherwise there would be no way to know what has been done.
Making Adjustments
Change account balance by adjusting Store Credit and Balance Credit:
- A plus to Store Credit increases Account Balance.
- A plus to Balance Credit decreases Account Balance.
To correct Store Credit, make plus or minus changes to Store Credit.
Delete a Client Record
To preserve an audit trail and protect shop owners from unauthorized or illegal employee actions, a client record cannot be deleted but it can be deleted (or used for a new client if there has been no activity in the account).
Hide a Client Record
To hide the record, edit the client's record and flag it as inactive by removing the check next to 'This Client is Active' and in Program Setup > Clients remove the check for 'Include Inactives in Work Area List.' Save/Exit.
It might be necessary to close the program and reopen for a reset, then check in the Clients Work Area to assure the client is no longer listed.
Reuse a Client Record
If no activity has taken place in the account (inventory added, sale processed...) the record can be edited (including the client ID) and used for a different client.
Remove a Duplicate Client Record
Remove a duplicate client record by editing it and using it for a different client, or edit it, flag it as inactive and in Program Setup > Clients elect to not show inactive clients in lists.
Keeping Client Accounts in Balance - how to use BCSS and accounting principles to keep client account balances in order.
Basic Accounting Principles
An understanding of basic accounting principles is necessary to make sure that all BCSS computations and client accounts are correct. A glossary or terms appears below.
Consignment Accounting
Accounting for consignment sales includes the added complexities of split sales proceeds and the settlement of sales. Otherwise, the process of recording sales and computing profits is essentially the same as for any store.
When a sale is finalized (saved in BCSS) accounts for the store, the client (and the employee in BCSS Diamond and Virtual) are credited and the settlement account is debited.
Accounting Terms
Allowance in Accounting Principles generally refers to an amount deducted from Accounts Receivable for bad debts. In Sales, Allowances are reductions in sale price based upon qualifying circumstances (like merchandise defect).
Accounts Payable are amounts owed by not yet paid (a form or debt); therefore, A/P is a form of credit which allows purchasers to pay for a product or service after delivery of the product or service.
Accounts Receivable (Trade Receivables) is the amount customers owe. On the Balance Sheet A/R's are a Current Asset if payment is due within 1 year.
Balance Credit is a manual adjustment. Positive/negative Balance Credit will subtract/add from/to Client balance.
Credit Balance is an account balance in the customer's favor.
Debit Balance is an amount owed to the seller.
- A debit transaction decreases a credit balance or increases a debit balance.
- A credit transaction decreases a debit balance or increases a credit balance.
Debits and Credits are a system of notation used in accounting to both keep track of the flow of money (transactions) into and out of an account, and to indicate the type of account. Traditionally, an account's transactions are recorded in two columns of numbers: debits in the left hand column, credits in the right. Keeping the debits and credits in separate columns allows each to be recorded and summed independently. The smaller of the two sums is then subtracted from the larger to give the account value. An account may thus have either a credit value or a debit value. more: http://en.wikipedia.org/wiki/Debits_and_credits
Gross Income is all income (from any source). For a business Gross Income is Pre-Tax Net Sales less Cost of Sales. (For individuals Gross Income is income before taking deductions or taxes into account.)
Income For households 'income' is the sum of all the wages, salaries, profits, interests payments, rents and other forms of earnings received. For businesses, 'income' generally refers to the amount of revenue remaining after expenses.
Profit or Net Income (the 'bottom line') is Total Revenue minus total expenses (in a given time period) and is equal to Total Revenue - Cost of goods sold - Sales discounts - Sales returns and allowances - Expenses - (Minority interest (shareholders) and Preferred stock dividends).
Inventory for consignment stores is generally a list of all items in the store for sale. Because ownership of consignments remains with sellers, consignments are not an asset of the store. Items that have been purchased by store principals which are for sale in the store are part of store inventory.
Net Sales (Revenue) is Gross Sales received for goods and services sold minus Sales Discounts, Sales Returns and Sales Allowances. Net Sales appear on the Income Statement as Sales or Net Sales.
- Sales Returns: Refunds for returned merchandise
- Sales Allowances: Reductions is sales price
- Sales Discounts: Reduced payments based on invoice terms such as 2/10, n/30 (2% discount if paid within 10 days; net invoice total due in 30 days)
Gross Sales is the total invoice value of sales (during a time period) prior to deducting discounts, returns and allowances. Net Sales appear on income statements - not Gross Sales.
A Sale is the seller's passing of ownership of an item to a buyer for money or other compensation. A sale of merchandise is recorded in a General Journal as a debit to cash (or accounts receivable) and a credit to the sales account.
Stock Keeping Unit (SKU) is a unique identifier (attached to each billable item, variant, product line, bundle, service, fee or attachment) used to systematically track inventory.
Store Credit is an amount the store (debtor) owes to the customer (creditor) which the customer may use to make purchases. Store Credit = Total Settlement Amounts - In-House Purchases. As In-House Purchases uses Store Credit, Balance Due plus Store Credit decreases. Shop Credit increases when settlements are made for credit. The Total Account Balance will remain the same while removing the sold inventory from the unsettled list. The outstanding account balance can then be used to purchase goods from the store. Most commonly stores issue store credit when merchandise is returned without the original receipt.
The BCSS Consignment Agreement
Disposal Code appears on the Consignment Agreement.
Print Agreement and Inventory List Press 'Print Agreement and Item List' on the Batch-Enter window (after entering items) to print the Agreement and item list. Choosing to print the Agreement at any other time will print the entire inventory for all consignors.
Two generic Consignment Agreements are included in BCSS. The 1st is for 1st-time consignors and prints on a full sheet of paper. The 2nd is a shorter version for repeat consignors. Two copies are printed on 1 sheet of paper.
When either is printed, BCSS auto-enters the shop's information (that was entered in Program Setup) and the Client's information (from the Client's record).
The 'body' of the 1st Agreement contains sample shop terms and agreements which may be changed.
The 2nd Agreement is a short form for recording any changed information (like new address, new phone number) and the number of new items consigned. It too may be edited.
Editing the 1st Consignment Agreement
Click on Utilities and select Edit Client Agreement:

Make deletions, additions, changes and click Save and Exit when finished. Restart BCSS. The changes will appear when the next agreement is printed.
Copy/Paste text into the Agreement Editor.
Note that any line in the Agreement should not be longer than (approximately) 120 characters. Lines longer than that will exceed the right margin of the printed page.
Note: The Agreement should be edited within BCSS. Writing the Agreement in Notepad, WordPad or any text editor and pasting into the BCSS Editor will lose the hard line breaks at the end of each line (created by pressing Enter at the end of each line).
The maximum number of lines that can be entered is 35.
The Agreement may be changed at any time. Past versions of the Agreement are not saved (but the content may be pasted into another document and saved).
Editing the 2nd Consignment Agreement
The procedure for editing the 2nd Agreement is different but fairly easy.
- On the Desktop, click on My Computer then C: then Program Files then BCSS.
- Click on addendum.txt. (This is the text file for the 2nd agreement.) Your computer should open addendum.txt in a text editor like WordPad or Notepad.
- Make changes. Hold down the control key and press the 'S' key to save changes.
- Close the file. Changes will appear when the 2nd Agreement is printed.
Printing the Consignment Agreement
In the Clients Work Area, RIGHT-click on a Client Record and select 'Agreement 1st' or 'Agreement 2nd' or, for the first Agreement only, select the Client and Press 'Print Agreement' on the right.

A Print-Preview Screen will display the agreement with shop and Client information pre-filled.
Preview the Agreement and press the printer icon to print.

Windows Print Setup
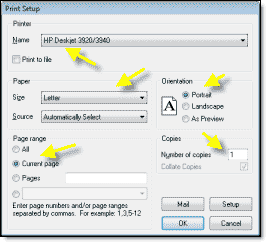
The settings should be:
- Name is the name of the printer to be used.
- Size in N. America will usually be 'letter'.
- Range: All or Current Page
- Number of copies can be changed.
When settings are correct, press OK to start printing.
Balance Credit reduces the Client Account Balance without affecting Store Credit.
To edit Balance Credit:
- Double click on a Client Record to open the edit screen.

- Click on the Account Status tab.
- Click in the Balance-Credit Field and enter the amount of the adjustment.
- Click OK to save the change and exit, or click Save and Continue to save the change and continue editing the Record.
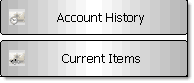
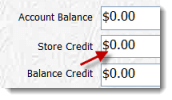
- To view the Store Credit, with the same Client still selected in the Client Work-Area Table, click on Account History (on the right)
or look below in the Details Area:
Client Percentage is the share of the sale proceeds to be paid to the client. The percentage set for the client will appear in the Consignment Agreement.
![]() Client % by Category - Assign different Client %'s to different categories. Go to Main Menu then Inventory then Categories. Select a Category and enter the appropriate percentage. Click Save/Exit.
Client % by Category - Assign different Client %'s to different categories. Go to Main Menu then Inventory then Categories. Select a Category and enter the appropriate percentage. Click Save/Exit.
![]() Client Bonus for Store-Credit Settlement - Give an automatic bonus to Clients who settle for store credit. In Program Setup on the Clients Screen, set the bonus amount in 'Bonus for Store Credit Settlement'. When 'Credit' is selected as the settlement payment method, the bonus is auto-applied. (not available with batch settlements)
Client Bonus for Store-Credit Settlement - Give an automatic bonus to Clients who settle for store credit. In Program Setup on the Clients Screen, set the bonus amount in 'Bonus for Store Credit Settlement'. When 'Credit' is selected as the settlement payment method, the bonus is auto-applied. (not available with batch settlements)
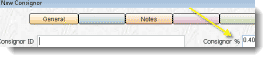
Set Client Percentage
There are 5 ways to set the Client Percentage:
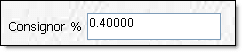
- The default percentage for all new clients is set in Program Setup. Click on File:

Click on Setup then Clients:

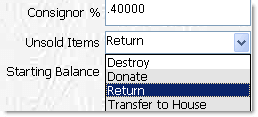
Change the default % (0.40000) to the desired value (in decimal form, like .50 for 50%).
The default percentage set for the client will appear in the Consignment Agreement.
- Change the Client Percentage when adding a new client on the New-Client Screen:
- After a new client has been entered, edit the Client Record and change the default percentage for that client. That % will apply to all new inventory from that client. It will not apply to existing inventory. Use the Percentage Tool to change the % for existing inventory and sold/unsettled items.
- After an inventory item has been entered, edit the inventory item record to change the percentage for that one item. (Double click on any Inventory Record to edit it.)
Make at least one backup of your data before using this feature. If changes are not acceptable, just restore the backup and try again.
The 'Percentage Tool' can be used to change the client % (the amount of the sale credited to clients) for 3 types of records:
- All current inventory
- All unsettled sold items
- All client %s
Change Client % (Unsold or Sold/Unsettled)
After an inventory item has been entered, edit the inventory item record to change the percentage for that one item. (Double click on any Inventory Record to edit it.)
To change the Client % on multiple inventory records (unsold or sold/unsettled), use the Percentage Tool:
The Percentage Tool: Change Client % Globally
The Client % can be changed for 1) unsold items and 2) sold-but-unsettled items. The options are to update:
- All unsold items.
- All sold unsettled items.
- Unsold items for one client.
- Sold unsettled items for one client.
- Change the current percentage for all existing client records.
Change Client % for One Client
Make a backup of the database before using this feature so the current data can be restored if needed.
- In the Clients Work Area, select a client.
- In the lower-left menu select Percentage Tool.
- The screen that opens is named 'Modify Global Client Percentage'.
- Remove any values in the 'New Client Percentage on Sales'.
- Enter the desired percentage in decimal form. (.60 = 60%; 1 = 100%; Do not enter 100 for 100%.)
- The first two options must NOT be used when changing the % of ONE client.
- To the right of 'Update unsold items from the indicated client only' click on the button with the client's name to update unsold items.
- Likewise click on the button with the client's name to Update sold but unsettled items (if appropriate).
- To change the client record to the same % for all clients, select 'Client %'.
- When finished, close the screen
- Spot check inventory and settlement records to assure correctness.
Change Client % for All Clients
- In the Clients Area, select 'Percentage Tool' in the menu at the bottom left.
- Remove any values in the 'New Client Percentage on Sales'.
- Enter the desired percentage in decimal form. (.60 = 60%; 1 = 100%; Do not enter 100 for 100%.)
- Select ‘Unsold’ to update all unsold items REGARDLESS OF CLIENT.
- Select ‘Unsettled’ to update all sold but unsettled items REGARDLESS OF CLIENT.
- When finished, close the screen (named 'Modify Global Client Percentage').
- Spot check records to assure correctness.
The Percentage Tool can be disabled by checking 'Hide Percentage Tool' on the Clients Tab in Program Setup.
Current Charges
Amounts can be charged to a client's account and paid by settlement, store credit or any method of payment.
Enter the Amount in the Client Record
- Edit an existing Client Record.
- Click on the 'Current Charges' tab at the top.
There are 7 types of charges.
- Edit an entry or use a new line to add fees.
- Either way enter a description and an amount.
- Click OK to save the entry and process the payment later (via a settlement or store credit).
- Click Exit to close the window and not save the entry.
- Click Save and Continue to save the entry and continue editing.
- Check the 'Pay This?' box and select Pay Selected to start processing the payment from Store Credit.
When this window is next opened, entries appear at the top, plus the 7 predefined types and blank lines below ready to be used again.
Collect Payment from Store Credit
- On the Current-Charges Screen, check the box(es) of the charges to be paid.
- Select Pay Selected. A Credit-Sale Screen will open with the amount of store credit available.
- If the amount of store credit exceeds the payment, click Save to save the transaction, or click 'Save, Preview, Print' to save and print the transaction.
- If the amount of store credit is less than the payment, additional payment may be collected by completing the payment information in Pay Method 1. Click Save to save the transaction, or click 'Save, Preview, Print' to save and print the transaction.
The client's account will be debited for the amount of store credit spent. If the payment exceeded store credit, store credit will be negative.
Collect Payment Via Settlement
- Go to the Mall screen in Setup and check 'Deduct other charges from settlements.'
- Select the Client.
- Press F7 or select New Settlement.
- The amount of the charge will be displayed as a deduction and can be edited.
Email Agreements, Receipts, Settlements and Reports
Consignment agreements, sales receipts, settlements and reports can be 'printed' in PDF 'Portable Document File' (as opposed to printed on paper).
A PDF printer is not a physical printer like ink and thermal printers but a software program that installs on the computer and 'prints to file'. The document is saved to the computer as an 'electronic document' with a filename (provided by you) and a file extension of .pdf.
Modern computers have a PDF printer driver installed. If one doesn't exist, this one is free: PDF Creator.
In BCSS, while viewing an agreement, receipt or report in print-preview mode:
- Click on the printer icon at the upper left:

- Use the down arrow to select the PDF printer.
- Click OK.
- Select a location on the computer to save the file.
- Provide a filename.
- Click Save.
The e-file (e-document, PDF file) can be attached to an email, uploaded to online destinations, edited/copied/deleted - like most other computer files.
Send Group Mail
Send a 'personalized' email to a list of recipients, addressing each person by his or her first name in the email greeting:
- In BCSS under Utilities, select Export Clients (or Buyers for those who purchase from your store). See Export Information to be used in other programs for details.
- Go to Mail Chimp. It's free.
- ...and take it away!
- MailChimp also provides written help.
Inventory List for One Client
There are 4 ways to view a list of inventory items for one client:
- 1 and 2: Account History and Current Items - Account Balance, Account Balance Purchases, Adjustments to Store Credit, Balance Credit, Beginning Account Balance, Cash Payments, Client %, and ID, Date of Last Action (sale or settlement), In Date, Invoice #, Item Description, Price, Quantity, Settlement Amount, Total Purchases, Total Settlements for Credit, Total Tax. In addition, Account History displays Settlement ID and Current Items displays Item Notes.
- 3. Detailed List - Barcode, Category, Client ID, Date In, Details, Discount, Discount Date, Item Description, Last Sale, Prices (Original and Current), Quantity, Total Price of All Items
- 4. Brief List - Category, Client's Name, Client ID, Date In, Description, Price, Quantity
Account History and Current Items
Account History shows all items consigned by a client, their disposition and how transactions produce the Current Account Balance. Current Items does the same but shows only items that have not been settled.
As of version 6.0.900 unsold inventory items appear in both reports (even though, of course, unsold items don't enter into the computation of the current account balance.
Create the Report
Select a Client from the Main Table in the Clients Work Area.
Select Account History or Current Items from Quick Links:
A comprehensive report will be presented and can be printed.
Print or view the Detailed List and Brief List this way:
- Select Reports.
- Select Inventory.
- Click the blue drop-down arrow and select the Client.

- For a Detailed List, press the Print Detailed List Button:

- For a Brief List, press the Print Brief List Button:

- If you wish to view a range of the Client's items, check the Items # Range and enter the first Item # only in the From Field and enter the last Item # only in the To Field. For example, if the Client ID is Steph and items are numbered Steph-1, Steph-2 and so on, and you want to see items 7 through 11, just enter 7 and 11, not Steph-7 and Steph-11:
(The range will be ignored if the box isn't checked.)
- To print the report, click on Print Detailed List or Print Brief List.
- To view the Report in the Main Table, press View the Report.
Causes and Cures for Negative Balances
Symptom: Account Balance and Store Credit are both negative.
Cause: Buying more in credit sales than has been earned in sales revenue
Cures:- Leave the negative balance to be satisfied from future sales, or
- Collect the difference from the client, or
- Manually adjust the account balance to zero and absorb the loss
Symptom: Account Balance is positive and Store Credit is negative.
Cause: Ringing up a store-credit sale before processing outstanding settlements
Cure: Manually settle with the client. The store-credit payment will appear in the first payment option and remaining funds will be displayed in the second payment method with check as the payment type.
The program will display the difference between Account Balance and Store Credit. The difference will be the amount available for purchases or settlement.
Manually adjusting the store-credit balance should ONLY be done in extreme cases as doing so causes the audit trail to be lost.
Settlement Payment for One Client
There are 2 places to prepare a payment for one Client -
- On the New-Settlement Screen
- In the Disbursements Work Area
1. New-Settlement Screen
When the New-Settlement Screen is opened, BCSS auto-enters the next available check #s. Ignore check #s if payment is other than by check.
To prepare a New Settlement, complete the first payment fields (Check #, Payment Method, Amount):
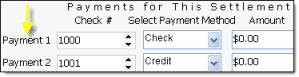
Split Payments
Payments to Clients may be split between 2 of these methods - Cash, PayPal, Check, Credit or Gift Certificate. For Payment 1 select a method from the drop-down menu under Select Payment Method and select another for Payment 2, entering the amounts for each under Amount.
The Client's Shop Credit increases when Settlements are made for credit. The Total Account Balance will remain the same while removing the sold inventory from the Unsettled Sales List. The Outstanding Account Balance (Store Credit) can then be used for purchases.
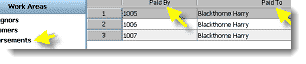
2. Make Payment from the Disbursements Work Area
When a Sale is settled, BCSS creates a Disbursement Record in preparation for payment to the Client. Click on Disbursements in the Work Areas Menu to view all Disbursements in the Table.
RIGHT-click on a Disbursement Record to view the Context Menu:
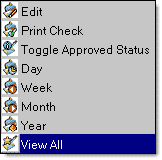
Menu Options:
Edit - Open the Disbursement in an Edit Screen, Make changes, if any, and Save.
Print Check - Begin the Print Checks Process
Toggle Approved Status - Approve or Disapprove a prepared check.
(the other options are for viewing Disbursements on a daily, weekly, monthly or yearly basis, or 'View All'.)
Edit the Check
Clicking on Edit opens the Check-Edit Screen:
There's provision for setting check margins in addition to changing the name of the Payee, the Date, the Amount, Approved Status and Address.
Print the Check
Selecting Print Check from the Context Menu begins the Check-Printing Process by opening the Check-Position screen.
Select which check position to print - 1, 2 or 3 and click to close the window.
A Print-Preview Screen will appear displaying how the check will be printed. If adjustments or corrections are needed, close the Print-Preview Screen and edit the Check Record.
If no changes are needed, select the Printer Icon at the top of the Print-Preview Screen.
When printing for the first time, print a check on a plain sheet of paper. Place the printed page over the check page and hold them up to see where print would have fallen on the check page.
Pay Multiple Clients by Check
See InstructionsQuick Report: How Much Are Clients Owed?
- Click on Reports in BCSS and select Clients.
- Check Account Balance.
- Enter a range (like 1 and 100000).
- Use 'Print the Report' to see balances, or
- 'View the Report' isn't useful for this purpose.
A 'Client Report' is basically the result of a 'search' of the BCSS database for specific Clients - like a Google search with an important difference: Based upon your 'search criteria' a BCSS Report will include only the desired information and not 'close matches'.
Create a Client Report
What is Store Credit?
'Store Credit' is an amount of money the store owes the consignor.
There are several reasons why a store might owe money to consignors (like refunds, account adjustments) but in consignment, consignors may be issued store credit as payment for sold items (to be applied to future purchases) vs payment by cash, check, gift certificate or PayPal.
Settlement for Store Credit
At settlement, BCSS provides options for how consignors are to be paid for sold items: cash, check, gift certificate, PayPal or store credit.
Manual Issuance of Store Credit
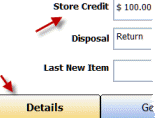
A Client Record may be manually adjusted to award store credit:
- Double click on a Client Record to open the edit screen.
- Click on the Account Status tab.
- Click in the Store-Credit Field and enter the amount of the credit.
- Click OK to save the change and exit, or click Save and Continue to save the change and continue editing the Record.
- To view the Store Credit, with the same Client still selected in the Client Work-Area Table, click on Account History (on the right)
or look below in the Details Area:
- Store Credit will appear on the Sales Invoice for Client Credit Purchases
. - Store Credit is adjusted automatically when a client buys from the shop and receives the client share from sales of items consigned.
Total Owed to Clients
One of the most-frequently asked questions is, "How much do we owe our consignors?" The answer is easy to find in BCSS.
Sales on hold will cause account totals to disagree. Either finalize the open invoice or void it to resolve the issue.
Display/Print Amounts Owed to Some or All Clients
- Select Reports:
- Select Clients.

- Check 'Account Balance' and enter a range:

(The box must be checked for ranges to apply.)
- Enter a large range (0 to 10000) to include all consignors.
- Enter a range (like 10 to 100) to see only amounts due for the range entered.
- The Report Output can be sorted:

- Press Print the Report:

- View the list on the Print-Preview Screen.
- Scroll down to see the total (or use the arrows at the top of the screen to navigate).

- Print the report by clicking on the printer icon:
- ...and complete the Windows printing process.
Year End Totals Owed to Clients
Each year at year end a reminder is sent to stores to keep a copy of the BCSS data as it exists at the end of the year. The copy is needed to create a report for amounts owed at year end.
Report output can be refined by changing settings of the Report Screen and pressing the Print-Report Button again.
Sold Item in Wrong Consignor Account
If an item is in inventory under the correct consignor account, the latter will be credited with the appropriate share of proceeds from the sale of the item.
If an item is in inventory under the incorrect consignor account, the latter will be credited inappropriately with the share of proceeds from the sale of the item.
Occasionally when entering an unlisted item, the clerk may choose the wrong consignor from the drop-down menu on the line item. This may be more frequent where numbers are used instead of names or partial names for client IDs.
Credit the Correct Consignor Account
- Select the applicable sale in the sales work area.
- If there is more than one item on the invoice, make note of all other items on the invoice.
- Void the invoice.
- Create a new invoice with the same date as the original sale.
- Reenter the item(s) (that were correct) and save the sale under a new invoice #.
- In the client work area select the client in question.
- Press F7 or click on new settlement.
- Verify that the item in question appears in the settlement list.