Search the BCSS Manual
Drawers, Printers and Scanners
Free U.S. Shipping ~ No Sales Tax (except TX) ~ 2-3-Year Warranties
Printers, barcode scanners and cash drawers are 'hardware' or 'peripherals'.
- BCSS Intro and a standard black/white ink printer print agreements, checks, receipts, reports, labels and hang tags (on 8.5 x 11 sheets).
- BCSS Deluxe prints barcodes on sheet labels and tags and supports cash drawers and receipt printers.
- BCSS Diamond and Virtual connect multiple computers together (at the same location to share the same database) and they print thermal labels and hang tags (from rolls).
Skip to: Scanners | Cash Drawers | Thermal Receipt Printers | Thermal Label Printers
Barcode Scanners
Barcode scanners are universal input devices like keyboards. Any barcode scanner 'should work' with BCSS.
Out of the box, plug the scanner (or wireless receiver) into any USB port, open Notepad and scan an existing barcode. The scanner should beep and the barcode number (only) should appear in Notepad.
Some scanners must be calibrated to produce 11-digit codes from 12-digit barcodes. See the scanner's user's manual for calibrating (which usually involves scanning a code in the manual called the 'Cut Digit Code' which tells the scanner to 'cut' the last digit of a 12-digit code).

Cash Drawers
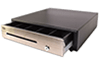
Locked cash drawers store valuables
A cash drawer (sometimes called a 'till') can be connected to a receipt printer and pop open when a receipt prints BUT shops selling used merchandise often have 'no-return policies' making the printing of receipts unnecessary.
With BCSS, the receipt printer ($284) can be replaced by a special adapter for the cash drawer which connects the drawer directly to the computer.
The drawer can be opened with the key of course, and it can be opened by pressing a secret key on the keyboard.
The drawer will not open for credit-card and PayPal sales, eliminating the annoyance and added effort. It does open for all other payment types (cash, check, etc.) that require placing something in the drawer.
Configure the Drawer with BCSS
- Install the software for the drawer. https://pos-x.com/download/evo-cd-usb-adapter/
- With the drawer connected directly to the computer, in the search box to the right of the Windows Start Button, start typing computer management.
- Select Computer Management.
- Click on Device Manager.
- Press the > to the left of ports.
- Observe the com port number for the drawer.
- In BCSS navigate to Program Setup > Sales.
- Check the box for 'A cash drawer is directly connected...'
- Enter the com port number.
- Save/Exit.
- Close the program and reopen it.
Press the F12 key or the up arrow, click on the hidden box to the right of F11 or process a sale for cash or check to assure that the drawer is working. If not, please repeat the steps above.
For free phone and remote-access assistance please call POS-X at 360-302-2222. A tech can log onto your computer to assist.
The terms "cash drawer" and "cash register" are often used interchangeably but refer to different components of the point-of-sale (POS) system. Here are the key differences:
 U.S.: $119 no tax free shipping |
|
Ink Printers
Ink printers print hang tags, labels, receipts, agreements, reports and checks on 8 x 11 stock.
Ink printers (LaserJet, bubblejet, inkjet, AllinOne, Dot Matrix) are universal and all should work with BCSS to print in black and white.
Price labels and hang tags are available on 8 x 11 sheets. Some stores print labels on heavier-stock paper and cut them out. Others print adhesive labels and stick them on customized hang tags.
Ink printers are cheap but the ink cartridges are not and they don't last long.
Inherent issues with these printers are out-of-ink runs, paper jams, smeared barcodes and partially-used sheets of labels or tags. A BCSS feature allows for a partial sheet to be fed and start printing on the next available label.
The only clear advantage of ink printers is the low cost of the printer - purposely designed to get them into the hands of users to sell ink cartridges. If you must go this route, opt for an AllinOne fax, copier, printer and scanner for utility. Better brands are HP, Brother, Epson and Canon.
After a few weeks of printing sheet labels and tags, most stores upgrade to BCSS Diamond or BCSS Virtual and thermal-label printing.
Adjust Print Position
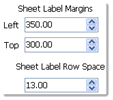
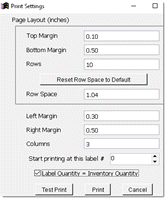
All ink printers behave differently. The program will send the same commands and settings to Windows which relays the print jobs to printers. Because there is no uniformity between printer manufacturers, the program allows for margins and row space to be changed to make print fall in the correct places.
On the Labels screen, the settings appear at the lower-left:
The same adjustment fields are present on the New-Disbursement Screen and the Windows Print Settings Screen:
Thermal Label Printers
Thermal label printers work differently from regular printers - they burn text directly onto labels, so you'll never need to buy ink cartridges.
Printer Recommendations
BCSS recommends and supports TSC label printers ( models 244, 247, DA210). While Zebra and Dymo printers can work with our system, results vary and we don't provide support for them. Other brands like the Godex 500 might be compatible, but we recommend testing with the BCSS demo first.
Getting Started
Before using any printer with our software:
- Install the printer properly
- Make sure it can print a self-test
- Check that the green light stays on
Need Help?
- For free TSC technical support: 657-220-7995
- For BCSS paid support: 888-427-5779
- For DIY solutions: Check out TSC's helpful videos and their Diagnostic Tool
Cost vs Value
A TSC DA210 thermal printer is $349 ($389 w/Bluetooth) - about 7 times more than a regular ink printer. However, it's actually more cost-effective in the long run when you're printing thousands of labels. Plus, labels on rolls tend to be cheaper than sheet labels since there's less waste.
Key Benefits
- Print single or multiple labels easily
- No more ink cartridge hassles
- No paper jams or partial sheet waste
- Long-lasting thermal print head
- Simple roll-based label system
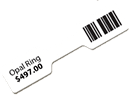
Sheet labels are limited to 3 sizes, 2 adhesive and 1 tag. Thermal labels and BCSS make 12 options available, including a 2.25 x .5 jewelry label:
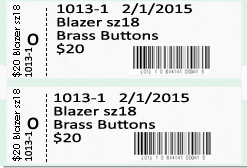
and this professional 2-part tear-off tag:
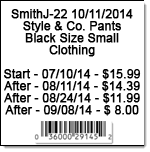
This is the 2" x 2" Adhesive Label with (optional) Discount Schedule:
Be sure to acquire a 'thermal direct' (not a 'thermal transfer') printer with a 4" (not 2") 'mouth'.
TSC Thermal Label Printers
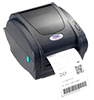 U.S.: $349 ($389 Bluetooth) free ship |
|
TSC Printer Configuration in BCSS
Three programs (Windows, TSC and BCSS) must work correctly separately and together for print success so setup is naturally more complex that plug-and-play devices like keyboards and scanners. Free help from BCSS is available for printers purchased through BCSS and is otherwise available at $25/15 minutes.
These resources are also available:
Download the printer software (the 'driver'): https://fs.tscprinters.com/en/dl/1/3448 After the file downloads, click on it to run installation. Use the default prompts during the process.
(Most Windows versions will save the file to the Downloads folder. Can't find it? In the search box at the bottom of your monitor type 'download' and select File Explorer.)
Video: How to load labels and tags ("media"): https://www.youtube.com/watch?v=LrGVUomAdXQ
Printer Self Test
Before attempting to print labels or tags from BCSS, make sure the printer itself is working:
- Type 'control' in the Windows search box at the bottom of the monitor screen.
- Select Control Panel.
- Click on Devices and Printers.
- Right click on the TSC printer icon. (No icon? Install the printer. If installed, reboot the computer and return here.)
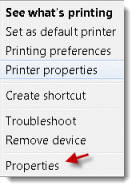
- Choose Printer Properties.
- Click on Print Test Page.
- Didn't print a test page?
- Check both ends of the printer cable. One connects to the printer. The other connects to the computer.
- On rate occasion a USB port can be bad. Try another port.
- USB 'hubs' can cause issues. Connect the printer cable directly to a USB port on the computer.
- Turn the printer on.
- The status light must be green. If red, turn everything off and back on, including the computer. Is the light green? If so repeat the steps above.
- Are labels or tags loaded correctly? See the video: https://www.youtube.com/watch?v=LrGVUomAdXQ
- Free phone help is available from TSC, 657-220-7995.
- If the printer was purchased through BCSS, call 888-427-5779 or email to sales@bestconsignmentshopsoftware.com.
Troubleshooting:
Programs send print jobs to Windows which relays jobs to printers. Windows requires supervision and management. BCSS and the printer require correct settings.
- When changing from one label or tag to another, close BCSS and reopen it to break the 'handshake' with Windows so Windows will get the message.
- Check to make sure Windows has remembered the correct printer settings in BCSS for thermal label printing. In BCSS go to File then Program Setup then Printers. At the bottom of the page for 'Label Printer' the first printer should be 'TSC DA210' (or your thermal label printer) and the 'Secondary label printer' MUST be 'None Selected'.
- While on that page, Make sure the correct label or tag size is designated. (Note that 2.25 x 1.25 can be an adhesive label or a non-adhesive hang tag).
- If Windows is not saving printer (and other) settings in BCSS, turn UAC off: https://vimeo.com/134888785
- Make sure the label set in BCSS matches the label in the printer.
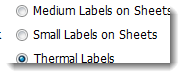
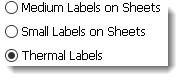
- Also make sure on the labels screen that 'Thermal Labels' is checked.
- Make sure the printer is working outside BCSS by conducting a self test:
- Go to Control Panel, Devices and Printers.
- Right click on the correct printer icon.
- Select Printer Properties the Print Test Page.
- Recalibrate the printer by turning it off, holding the feed button down and turning the printer on. (video)
This is a link to the TSC website page for the DA210 thermal label printer: - https://usca.tscprinters.com/en/products/da-series-4-inch-performance-desktop-printers
The TSC user's guide: https://usca.tscprinters.com/en/downloads
Thermal Labels Troubleshooting
There is no print preview for thermal labels. If a print preview appears, the most likely cause is that 'Thermal' is not selected as the Style on the Labels Screen:
The other 5 settings in that area as well as the adjustments for top/left margin and row space are for sheet labels.
Labels Printing Too High or Low: Each time labels are changed, close BCSS and reopen it to break the handshake with Windows. Turn the printer off, hold the feed button down and turn it back on. The printer will feed 2 labels and calibrate itself, meaning that by feeding the label it will learn the new label size and type (adhesive label or non-adhesive hang tag).
When loading labels the perforation should be just under the lip of the clam shell with the colored border barely showing. Printing one label should position the next label correctly using the vertical 1.19 x 3.38 label. Watch the Calibration Video.
Labels Won't Print
Print jobs are sent from BCSS to Windows (not directly to the printer). After changing the label in the printer, change the settings in BCSS, then close the program and reopen so Windows will recognize the change.
The most common error using BCSS is that 'Thermal Labels' is not selected either in Program Setup > Printers Tab or on the Labels Screen. The other five options (Barcodes, Detailed Labels, Hang Tags, Medium Labels, Small Labels) pertain to sheet labels and cannot be selected for thermal labels):
- In BCSS on the Labels Screen, labels won't print for items with quantity of zero if 'Quantity Greater Than 0' is checked (at the top).
- On the Labels Screen, labels won't print for items that are excluded by any filters that are set.
- Multiple labels for the same item won't print if 'Label Quantity = Item Quantity' is not checked. (upper left on the Labels Screen)
- Bar codes won't print if the option is not check (Program Setup, Printers tab)
- Complete Discount Dates and Prices can be on labels that are large enough. They cannot be printed on jewelry labels or 2 x 1 labels.
- If the Discount Schedule is being printed on the price label, it is because 'Show discount price schedule on pricing labels' is selected in Program Setup, Inventory. The first price in the Discount Schedule is the Current Price.
Print is Cropped
Choose smaller font sizes for tear-off and/or stub settings in Printers in BCSS Program Setup on the Printers page.
Label Skip is often caused by a difference between the label loaded in the printer and the label designated in BCSS. To the printer, there is a significant difference between the 2.25 x 1.25 and the 2.25 x 1.38, or between the 2.25 adhesive and 2.25 non-adhesive.
Watch the Calibration Video.
Dymo LabelWriter 450
Uninstall the Dymo printer and reinstall it using this download.
Compared to a commercial-grade thermal label printer ($349/$389), a Dymo printer is inherently less dependable. The most common complaints are 'it worked for a while then stopped working' and 'it can't print barcodes accurately'.
BCSS is configured to work with the Dymo 450 (including the Twin Turbo) but Dymos are not recommended.
Before a printer can be used with the program it must be able to print a self test successfully. If that isn't happening, please call Dymo at 1 (877) 289-3966. For paid support call BCSS 888-427-5779.
If the printer can self test but doesn't work with BCSS. install this driver: http://files.hibiscus.fea.st/public/DLS8Setup.8.5.1.exe
One source of labels is Uline: https://www.uline.com/BL_8650/Dymo-LabelWriters
Once a Dymo printer has passed a self test:
- In BCSS, go to File (upper left in the program) then Program Setup.
- Click on the printers tab.
- At the bottom of the page, in the Label-Printer section, use the dropdown menu and select DYMO LabelWriter 450 or DYMO LabelWriter 450 Twin Turbo.

The name of the Dymo printer must be one of those 2 options. If the name is something different, go to Control Panel > Devices and Printers. Right click on the Dymo printer and select Printer Properties. Replace the name with 'DYMO LabelWriter 450' exactly. Save and exit. Go back to our program and select the Dymo printer as the label printer.
- Make sure this option is not checked:

- Select the label size. Only these sizes will work with BCSS:

- For the Twin Turbo label printer, load two different labels and change this setting in BCSS to let the program know which label to print on.
- Check the box if barcodes are to be printed on labels and tags:

- Click on Save/Exit.
- Close BCSS and reopen it.
- At the top of the screen, select Labels.
- Check 'Thermal Labels'. (It is required that this option be selected. The other five options are for sheet labels.)
- Confirm that the correct label has been chosen.
- To test the printer, click on Select Labels to Print:
- Select 3 labels from the list. (Inventory items must have been entered in the program for items to be listed.)
- Click OK. If all is well, labels should print.
These are the adhesive labels that can be use:
Related: How to print thermal labels.
Dymo Troubleshooting
If labels don't print correctly, measure the label loaded in the printer and compare the size to that selected in BCSS. If the label size is changed in BCSS, close the program, reopen it and try again.
BCSS supports the use of working Dymo printers. Before a printer can be used with the program it must print a self test successfully. If that isn't happening, Please call Dymo at (877) 289-3966.
Dymo offers this caveat @ http://lwfix.dymo.com/EN/index.html: "Some LabelWriter printers manufactured after April 1, 2014 will not properly install on Windows® 7 PCs when attached to a USB 3.0 port. DYMO has developed an update that will fix this problem on these printers."
Zebra Label Printers
Before a printer can be used with the program it must be able to print a self test successfully. If that isn't happening, Please ask Zebra support for help, https://www.zebra.com/us/en/support-downloads/printers.html. For paid support call BCSS 888-427-5779.
Best Consignment Shop Software was originally configured in 2002 to work with Zebra printers and it still does; however, Zebra printers are no longer recommended (or supported) because of a long history of issues and difficulty of use. Current Zebra models may work better than the older LP 2844 or 2824 and if you have one, install the software for it, chose the printer in Program Setup > Printers in BCSS and attempt to use it.
PDF (Portable Document File) Printers
A 'portable document' file is a digital image of a document that can be viewed onscreen, printed and forwarded (emailed).
For our purposes, consignment agreements, sales receipts, settlements and reports can be 'printed' in PDF format ('printed to file') (and emailed) using software for PDF printers.
A PDF printer is not a physical printer like ink and label printers but a software program that installs on the computer just as ink and label printers do. When a command is given to print a document (agreement, receipt, settlement, report) to 'file' the PDF printer is selected as the printer Windows should use to complete the print job.
Free PDF printers are available for download and installation. Once installed the PDF printer will appear in the Control Panel under Devices and Printers and can be selected from the Windows Print Screen when previewing a print job.
PDF Creator is free and makes it is easy to email documents and to merge multiple test-print settlements into one document (or file) for easy viewing/printing.
Google Cloud Print Connect a printer to your Google Account and print anything from any web device. Share & manage printers and print jobs with anyone.
Thermal Receipt Printers
Receipt printers print 3" sales receipts - never labels.

Extra Cuts? See how to stop them.
Stores selling used merchandise usually have 'no-return policies' so printing receipts is a waste of the expenses of the printer, paper and the hassle of printing receipts.
If a purchaser requests a receipt, of course, a receipt could be hand written, or one can be printed in Excel's Invoice Format with BCSS and an ink printer:
- Go to File then Setup.
- Click the Printers tab.
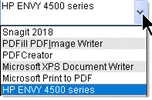
- For 'Ink Printer' use the drop-down menu to select the ink printer:
- Select Save/Exit.
- In the Sales Work Area, select a sale then choose Print Receipt (lower-left menu), or
- When entering a new sale, click on 'Save, Preview, Print' to view a preview of the receipt then click on the printer icon to print the receipt.
POS-X Thermal Receipt Printer
U.S.: $284 free shipping |
|
Each printer is shipped with a manual, sample roll paper, a USB cable and an AC power adapter. Shipping is free in the lower 48 states and Canada. Additional shipping charges may apply elsewhere.
The printer must successfully print a self test before it can be used with BCSS. Free POS-X support may be reached at 800-790-8657 . Please refer to the printer's manual for setup, configuration and use. (The manual may be viewed online at https://pos-x.com/downloads/.)
|
BCSS Deluxe, Diamond and Virtual can print receipts on 3" roll paper using the POS-X line of thermal receipt printers which uses thermal heat to burn print onto the paper. Store information entered in BCSS Program Setup (General tab) will appear on each receipt. Entries like "All Sales Final" in the email and website fields will also be printed on receipts. If the store name is too long, shorten it in Program Setup. The text can be up to six lines, fewer if there's a 2nd address line, email address and/or web site to be printed. In Program Setup > Printers Tab, the font size can be changed for the header and text, and the store name can be printed or not: A logo can be printed using POS-X printer settings. |
Installation Notes:
- The printer connects to the PC via USB. If the printer is not printing after installation, check the port setting.
- The printer name is 'POS-X Thermal Printer'. (earlier version: 'VENDOR THERMAL PRINTER') The name will appear during installation and in the Control Panel under printers. It is listed as LK-TXX 3.5.1 in Programs in the Control Panel. In Windows Programs the printer's folder is named THERMAL PRINTER.
- It is necessary to accept the default name for the printer during installation (currently 'POS-X Thermal Printer'). Printers often won't work if the name has been changed.
Installation Procedures:
- Remove the printer from the box and connect it to the PC's USB port. (Note that on some PCs the USB ports on the back or front of the computer may not be functional. If the self test does not work, trying using a different port.)
- USB ports on the back of a desktop computer often have more power than the ports on the front. Use the back ports for printers. Use the front ports for mice and keyboards.
- Reboot the computer and tap the F8 key before the Windows screen appears.
- Under Advanced Boot Options, select 'Disable Driver Signature Enforcement'.
- Download the driver (https://pos-x.com/download/thermal-receipt-printer-driver-2/). (Don't select Run on the download screen.)
- When the download completes, click on Open Folder.
- Right click on the installation file and select 'Run as Administrator'.
- Click Next.
- Click on POS-X Thermal Printer or VENDOR THERMAL PRINTER.
- Click on Installation.
- Select the correct Windows edition.
- Change the port to USB.
- Leave 'Rebooting' checked and click OK.
- Go to the Control Panel.
- For Vista select Printers.
- For Win7/8/10/11 select Device and Printers.
- Right click on POS-X Thermal Printer or VENDOR THERMAL PRINTER and select Printer Properties.
- On the Ports tab change the port to the highest-numbered USB port and click Apply.
- On the same Properties Window, go to the General tab and print a test page.
BCSS Configuration
BCSS needs to know which printer will be used for printing receipts. The printer can be a standard ink printer (for full-page receipts) or a thermal receipt printer (for 3" receipts).
- Open BCSS.
- Select File then Program Setup:
Click on Printers:

- To the right of Print Receipts use the drop-down menu and select 'POS-X Thermal Printer' or 'VENDOR THERMAL PRINTER ' or 'LK-TXX'.
- Click Save/Exit.
- Close BCSS and reopen it.
- Switch to the Sales Work Area.
- RIGHT click on a sale and select Print.
- If a sale hasn't been entered press F6 to open a Sales Invoice.
- Enter a test item and payment.
- Click 'Save, Preview, Print'. A receipt should print (and the cash drawer should open if one is attached to the printer).

If a receipt did not print but a window appeared, the receipt printer is not set as the receipt printer in BCSS Program Setup.
If settings are saving in BCSS, turn User Account Controls off and make the settings again.
Tips and Tricks
Thermal receipt printers use thermal paper obtainable from office-supply stores.
Paper Specifications: Paper width: 82.5mm; Roll diameter: Max. 83.0mm, Thickness: .065 to .1mm
Clear Problems. Some malfunctions can be cleared by shutting the printer off, rebooting the computer and turning the printer back on. Print Spooling (or Pooling) is turned off by default and should be left off. Also, USB ports on the front of PCs tend to have insufficient power for proper function.
Adjust Print Size. In BCSS, go to File then Program Setup then Printers. In the Print Receipts section, change the Header and Text Fonts as needed.
Print Copies. In the Control Panel, right click on the POS-X listing and select Printing Preferences then click on the Advanced tab. Click on '1 Copy' and set the desired # of copies to print.
Print Fix. If the receipt is not printing properly check the currency setting in BCSS Program Setup (General tab) and make sure the correct printer is designated in Setup on the Printers page.
Correct Printer Settings / Stop Extra Feeds:
- Click on Start then Control Panel.
- Click on Devices and Printers.
- Right click on the listing for the receipt printer.
- Select Printer Properties.
- Click on the Advanced tab.
- Click on Printing Defaults. (Drag the screen upward if necessary.)
- Click on Advanced.
- Set paper size to 80 x 297 mm.
- Click OK then OK again to close the Defaults Screen.
- On the Advanced tab, select 'Print directly to the printer', then click Apply.
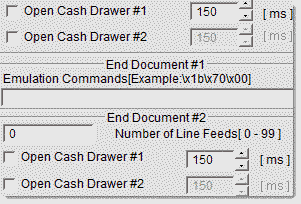
- Click on Printer Commands.
- Uncheck all options to Open Cash Drawer. (BCSS will send an 'open drawer command'.)
- For 'Cut the paper' or 'End of Document' use the drop-down arrow and select 'No Feed'.
- Click Apply.
- On the General tab, click Print Test Page (lower right). A test receipt should print. If it does not, call for free tech support at POS-X, 800-790-8657.
- Click OK to exit setup.
- In BCSS, Program Setup > Printers Tab confirm that the radio button is checked for 'Receipt Printer' and that the correct printer is designated. The printer name must be exactly the same name as shown in the Control Panel:
- Save/Exit.
- Always close BCSS and reopen after making settings changes.
- Reopen the program and test by printing a sales receipt. (Go to the Sales Work Area, select any sale and click on 'Print Sale' at the lower left.)
- If there's still an issue, turn the computer and printer off and back on for a fresh start.
BCSS sends the print job to Windows which forwards it to the printer. Windows and printer behavior can vary from one computer to another so if 'no feed' doesn't produce the desired result, try the other options under 'Cut the paper'.
Stop Extra Paper Feeds:
- Click on Start then Control Panel.
- Click on Devices and Printers (Printers in XP).
- Right click on the listing for the receipt printer.
- Select Printer Properties.
- Click on Printer Commands.
- Uncheck all options to Open Cash Drawer. (BCSS will send an 'open drawer command'.)
- For 'Cut the paper' use the drop-down arrow and select 'No Feed'.
- Click Apply.
Troubleshooting the EVO Thermal Receipt Printer
- Turn the computer and printer off.
- Turn the computer and printer on.
If the problem persists:
- Make sure the printer is connected, turned on, has paper and no paper jams.
- If the printer won't open, paper particles may have accumulated. Slide the front plate off. Spin the white knob several times in the same direction to lower the blade and open the printer.
- Go to Start, Control Panel, Printers. If your printer is not listed in Control Panel/Printers, see Installing the EVO Printer Driver.
- Run a test print. (See the printer manual.)
- If the self test fails, test the cable (which connects the printer to the PC) with another piece of hardware that is known to work, or try another cable then self test again.
- In Control Panel, Printers, delete any printers that aren't being used.
- In the Control Panel, click on Device Manager and verify that there are no conflicts (yellow circles with black exclamation points). If there are, click on Start then Help and Support. Search Windows Help for 'conflicts'.
- In the Control Panel select Devices and Printers (or Printers in XP).
- Double click on VENDOR THERMAL PRINTER or POS-X Thermal Printer.
- Click on Printer (upper left) and click on ‘Cancel All Documents’.
- Click on Printer (upper left) and click on Properties.
- Click on Ports.
- Select the highest-numbered USB port that does not have a printer assigned to it.
- Click on the General Tab.
- Press Print Test Page. A receipt should print. If it does not please contact free POS-X support at 800-790-8657 .
- Open BCSS and print a sales receipt.
Vertical Lines Are Printing
- Inside the printer, about an inch down from the tearbar there is a black and gold bar. That is the print head. Clean the print head with a clean rag and alcohol.
Problem: The printer was working. Now it isn't. Receipts print when the printer is turned off and back on.
Cause: Windows may be confused about what to do with print jobs: Print them right away or print them later.
Solution:
- Go to Control Panel and select Printers.
- RIGHT click on VENDOR THERMAL PRINTER or POS-X Thermal Printer. (That's the EVO Thermal Printer).
- Select Properties.
- Click the Advanced tab.
- Check 'Print directly to the printer'.
- Click Apply and OK.
- Retry printing a receipt in BCSS.
If there is a problem call POS-X support at 800-790-8657 or complete a service request at http://pos-x.com/support/.
Print a Graphic Logo on Receipts
- Create a 250 x 250 pixel .bmp (bitmap image).
- Go to Control Panel and select Devices and Printers.
- Right click on VENDOR THERMAL PRINTER or POS-X Thermal Printer and select Properties.
- Click on the Logo Selection tab.
- Click on Logo Download then Open File.
- Locate and select the .bmp image.
- Click on Upload (lower right). A message should appearing confirming the upload and stating that the device must be reset to make the image available for printing.
- Close the Upload Screen and reopen it to view the logo under 'Printed Image'.
- Adjustments can be made on the Logo-Selection Screen for positioning the logo. Enter a number in 'Number[1-255]' to activate the Start-Logo or End-Logo settings. Change these values to move the print position of the logo.
- Select Left, Center or Right from the drop-down menu.
- Click Apply and OK to close the window.
Power Management
- XP Pro, Vista and Windows 7/8/10/11 have 'Power Management'. If the printer has to be turned off and on to resume printing, try disabling power management on USB ports:
- Right click on My Computer and go to Properties.
- Click on Device Manager (or Hardware Tab then Device Manager).
- Expand the Universal Serial Bus Controllers.
- Double click the first USB Root Hub and go to the Power Management Tab.
- Uncheck 'Allow the computer to turn off this device to save power'.
- Do this for all USB Root Hubs.
If there's continued failure, the printer could be defective but before the delay of returning it or having it shipped for warranty repair, have a local technician test the printer. Often minor things are overlooked like printer connection, port settings, paper loading and jams, spooled print jobs and correct configuration. If a functional printer is returned for replacement or warranty, the hardware distributor will require that you cover all costs (which can be over $100).
Support
New or Used?
The shortest distance between you and success is new hardware - a solid foundation for your business. New hardware purchased from the software vendor assures compatibility and reliability as well as support. Hardware suppliers support their equipment 'for free' and charge a fee for supporting equipment purchased elsewhere. Used/refurbished/outdated equipment is not recommended or supported.
Any equipment must successfully 'self test' before it can be used with BCSS. The providers of equipment can assist with installation and testing.
POS-X Support - Scanners, Cash Drawers, Receipt Printers
TSC 244/247 DA210 Thermal Label Printer Support
Contact Josef or Arjun for free help with installation and testing at 657-220-7995, or service@tscprinters.com.
VideosBCSS Support of Hardware
BCSS provides free help for 30 days with installation and configuration of hardware purchased from BCSS. Support beyond 30 days and for all other equipment is available at currently-quoted rates. 888-427-5779.